Sunday, December 28, 2008

Carb fiddling

Got the seven back and it was leaking fuel out the manifold.  Combined with the surging at idle, I'd expect the likely cause to be failed O-rings, so I ordered a set from http://www.fastroadcars.co.uk/ as well as some thackarey washers.   As I will need to remove the carb I ended up buying a carb synchrometer too.  My hope is that speed-on got the idle jets close enough that sorting out any air leaks wont cause it to run badly now.

I did go for a quick blat though, and found the car to run pretty much spot on, the progression is pretty nice, occasionally a little hesitant but I think that will be cured once the air leak is sealed.  I was spinning the wheels in first second and third when it came on cam, so had to take it very very easy.  The fan and oil cooler seem to be working great as its now sitting exactly on 80C when on the move rising to about 90'ish before the fan kicks in and brings it down.

Contemplating going to work and back in it tomorrow.


'Ring Trip

Went to the Nurburgring yesterday, got up at 8 am, jumped into the car got about 1/2 a mile and realized the engine was up to temperature already, this is surprising because it was -5 outside and it normally takes quite a long time.  Delighted at the prospect of getting some warm air into the cabin, I turned on the heater and was belted with ice cold air.  Something strange was going on, at first I foolishly thought it was the heater that had a problem. When the steam started escaping I quickly realized the problem.  Apparently my antifreeze had frozen, and the system was blocked, watching the temperature gauge go from normal to really really hot to almost freezing again confirmed my suspicion.  
Ten minutes by the side of the A12 and everything looked under control, and I topped up the fluid and went on my way, eye glued to the water temperature for the rest of the journey.  I arrived at the entrance to the nordschleife around 11 bought some tickets, and had a pee before setting off.

The track was cold, and there was frost in quite a few places outside the racing line.  The good news though was that the track was almost empty meaning I had
 it pretty much to myself.  This gave me time to work more on my line and concentrate on getting the gear changes correct, lining up for the bend and turning in at the right point.  

The first few laps I was predominantly in 3rd gear dropping to second up the hill after the Breidscheid entrance, then as I got a little better and a little more confident predominantly 4th dropping into 3rd for the uphill, and towards the end I was hitting 5th and the speed restricter in the faster sections.  

I found myself turning in way too early for adenauer forst, and nearly failed to turn left a couple of times, I still don't really know the track at all in relative terms.  I also struggled a bit with the right hander somewhere else, I've no idea what the bend name is.  

I was amazed how much of my undercarriage 
the karussell removed from my car, there was an obscene amount of scraping and grinding before being spat out at the end, but one of my favorite bends of the circuit, I was entering round about 45, and exiting around 50, I got th
e impression the car could go a bit faster if I kept the speed up on entry.  The MX5 doesn't have the power to really increase speed that quickly.
Overall a great trip, the ice was a bit sketchy, but worth it to have the track to myself.  The EBC greenstuff pads seem to do a pretty good job, but there is less feedback from the pedal than I would like, and not a lot of bite, so perhaps its time to change them.


Thursday, December 25, 2008

Fury Prep Work

Pressed the studs into the alloy front hubs, stripped out the bearings and studs from the rear assemblies, and started to clean them up.  I'll need to get the rear hubs turned down to fit into the disks, which fit over the top.

Now the garage is taking shape I'll start to get the rest of the donor parts stripped and repaired.  I decided on this build to completely refurb everything. Collapsing bearings and worn seals have been the bane of my life since getting the seven on the road.  

Once the rear hubs are turned down, I'll paint them, press in the studs and new bearings, then assemble the calipers ready to mount. 

The next thing to do is the diff, I have new seals and bearings to fit, but im not sure if i will paint it or not.


Mad Dogs and Englishmen

Got the seven back yesterday, Mischa looked a bit surprised when I said it was going in the back of the van, but my patented trick worked.  Spent some time today in the garage, first job was to fix some minor things I wasn't happy with.  The clutch pedal was sticking way too far backwards meaning it felt too far forward and had way too much movement, so i adjusted  the lash so that it sits in line with the break pedal.

I'm not sure what Tim did with the throttle, but it was way too stiff, so i moved the adjuster to increase the leverage, and removed one of the springs.  

The alternator wasn't working any more for some reason, i think when I cleaned and painted it I disturbed something, so i took it out, cleaned all the contacts, and wiggled everything and now its fine.  

I let the car warm up for a while to check that it wasn't going to overheat, the fan kicked in, cooled it down and worked well, partly i expect down to the low temperature.  There was a lot of popping and spitbacks, the manifold was leaking a little on the exhaust, so I tightened up the bolts and it made a bit of a difference, then I noticed that some fuel was dripping down from the O-rings between manifold and carbs, tightened them up and it made a bit of a difference, but not much.  I also noticed that the air filters were quite soaking in fuel, not a good sign.

Went out for a quick drive, I'd forgotten just how addictive the car is, the rebuilt engine is a *lot* better, much more responsive.  The idle is surging a little and needs some love, but its pretty sorted for the most part. I'll need to adjust the bias on the brakes again with the new calipers its way too much to the front.

Brought the car back and noticed some oil dripping, it looks like there is stuff coming out of the breather and dipstick so i've tightened up the connections and we'll see what happens.


Tuesday, December 2, 2008

Bits and Bobs

Neither car ready yet, fury is at least progressing, seven still not imported which is a bit pants.  Ordered wheels from George Polley Motorsport, went for 6x13 CXR's in black on the front, and 7x13 on the rear.

I decided on keeping et18 offset on the front, and based on the notes from Rob Collingridge, did my best to get the right offset on the rear.  Rob used 13x6's on the rear, but had to use a 10mm spacer, by my working, that would be et8.  Now, if I use 7" wide wheels, to keep the same inner clearance, I need to increase the amount the wheel sticks out by half an inch (12mm) so that would be an offset of ET-4.  ET0 therefore seems like the sensible option.  

I went for Yokohama A048R tyres all round with 185x60 on the front, and 205x60 on the rear.

I also ordered a large selection of nuts and bolts from namrick.  I will also try to get a price for the nitrons today too.

Friday, November 7, 2008

Todo

In a weeks time I'm off to the US and Mexico for three weeks, before I go I want to make sure that a few things are sorted out.

The garage is ready for me to move into, I need to sort out the paperwork with the agent, and then pay the owner the rent. This should be fairly straight forward, but my overly-realistic self thinks it will be a ballache. I also want to see if I can get the floor painted before I go to the US, that will give me plenty of drying time.

It would be good to get the shelves in, but thats not goign to happen, and the bench I will bring from the UK as I should have space in the van this time around.

I will try to get lights mounted somewhere though, as at the moment there are not enough, and it will be harder with the car in the way. I may also move in the toolboxes and compressor, but I'm in two minds if i should just fork out for a larger capacity compressor or not.

I will leave the car lift until the new year, as although its nice, its not going to be required until its nearer a rolling chassis.

I need to confirm with Chris at BGH the order state, fuel tank, and check nothing is missing from the order. I also need to confirm the price for the fuel tank and powder coating.

I may order some wheels and or Nitrons and get that over with too. It looks like most of the parts have turned up in the UK though which is good so I'm more or less good to go now. I need to order some sundries from Screwfix, mainly gloves, drills, rivets and some hand cleaner.

Apart from that I think I'm all set for a rolling chassis. Next main big components to get will be:

  • Shocks
  • Wheels
  • Reverse Box
  • Engine
  • Prop shafts
  • Cooling system
  • Exhaust
I can possibly start doing some things in the interior like the seats and seat belts, but think its better to wait until the body work has arrived before I do too much in the car.

Thursday, October 23, 2008

Mega Order

Phoned rally design, they don't stock the raceleda hubs any more, but do still stock their own group 4 ones which fit a standard stub with standard bearings. I decided to go for these, they are cheaper than the raceleda ones, but noticably heavier looking.

Speed-on stock an M10-1/8NPTF adaptor for a few euros so I'll give that a try assuming I can actually buy one from them, if not I'll lop the end off and fit one to the hose at a later date.

I ordered the rest of the braking system

  • Escort RS Donor - Powerlite - 265mm Solid Kit (BK1R) Style of disc Grooved
  • Sierra (Drum) Powerlite HB Caliper - 240mm Solid Kit (BK65)
  • Powerlite Handbrake Caliper - CABLE (RD6902)
  • Powerlite 4-Pot Fast Road Ceramic (Poly-Q) (15Q-8812K)

Some bits I need for the steering

  • Escort MK2 2.9 Ratio Steering Rack RHD (RD870)
  • ALLOY RACK CLAMPS Escort MK1 & MK2 (RD848)
  • 2 WHEEL BEARING KITs, PER HUB (RD744)
  • 2 Group 4 Ally Hub - STD/STD (RD199)
  • 2 STANDARD GREASE CAPS - ALLOY - ESCORT (RD757escort)
  • 16 Standard plus 25mm 63mm long 12mm 1.5 Ford (SS37)
  • 16 Wheels Nuts - 12mm 1.5 19mm (3/4") HEX 60ยบ (SN41)

And the rest of the fuel system

  • 8mm - 5/16 ID HOSE (LMA367)
  • Copper Nickel Brake Pipe 1/4 - 25 Foot Coil (CNF014)

After getting expensive quotes from breakeryard.com I relented and bought a diff from ebay. I also need to get some track rod ends, probably from ebay too.

Just waiting on Chris confirming the costs for the Tank, Powdercoating and uprights, and of course a delivery date.

The next logical thing to get will be the Shock absorbers, Nitrons are going to be expensive though sadly, I will then find myself some build wheels and I'll have a car that can roll, stop, turn and spray fuel into the engine bay.

After that its the reverse box and drivetrain.

Wednesday, October 22, 2008

Order Progress

Spoke to Chris today, Arranged for everything including the floor to be powdercoated tangerine. Discussed a number of points of confusion for me, the brake flexible hoses will be m10x1 male on the end, so I need to convert them to 1/8th ntpf somehow. I might just whip the ends off and stick an NTPF fittings, or at least M10 Female. Ordered a 6Gallon tank, a bit small perhaps, but will do nicely for now, complete with baffles, a sump, and return pipe. We're still not sure on the uprights, in theory standard Escort ones should be fine, but I was planning on putting Alloy hubs on, so I need to check that they fit the smaller stubs. I shall place an order at raldes sometime later today.

On the list of things to do is:

  • Check the price for the fuel tank
  • Confirm the colour code that the whole kit and kaboodle will be powder coated
  • Check with Rally Design that the hubs will fit
Chris recons the order will be ready mid to late November, which is more or less Ideal as I'll be back from Supercomputing and the US no later than the 8th of December.

Tuesday, October 21, 2008

The Speed-On Minute

The seven has been at Speed-on now since the 26th of August, thats quite a long time, in fact thats almost two months.   You would think that in that time i'd be having a new build, but no, here is the list of things to do:

  • Weld on a nut to the manifold so that I can plug in the LC1
  • Align the wheels
  • Balance and tune the webers
  • Import into the netherlands.

The wheel alignment has been done, but still waiting on everything else. Not amused.  Thankfully the weather is so pants I can't drive it anyway.


Yet More Ordering

Bought a bunch of stuff for the build:

  • Sytec Universal Fuel Filter and Bracket 9.99 ebay
  • 2 Freelander diff/driveshaft oil seals 10.58 Ebay
  • Walbro Injection Pump 50.00 Ebay
  • Oil Drain pan to replace the one i dropped the car on 13.99 Ebay
  • 2 Sierra Wheel bearings 19.98 Ebay
  • Steering Column Bush 2.95 Ebay
  • Sierra Driveshafts, Hub Assemblies, Handbrake, Column and Link, spare column 219.95 - Ebay
Didnt manage to lay my hands on a diff, standard ones keep going for silly money, nor did i get a reverse box which was a shame too.


Tuesday, October 7, 2008

More Ordering

Ordered some wheel bearings from Ebay - Very impressed with the Quinton Hazell web site, not only can you still download the good old fashioned catalogues and browse through an amazing about of detail on every single component ever made, but they have a new application called Q-PID which enables some seriously handy searching.  That in itself could have been done of course using the web, but for some reason they chose to make it an application, now thats were normally I'd go back to catalogues.  Today however i noticed it ran on Adobe AIR, which I've never used before, but I gave it a go.  Not only does it work on my Mac-book, its well designed, fast and makes live unbelievably simple.  Using it I could find out what parts would fit, what the competitors part numbers were, and then pump that into Ebay to find the bits I needed. Clever stuff.

I also managed to find some well priced Freelander diffs.  One of them even has a Quaife LSD, hopefully i'll get a bargain on that, if not i'll stick with an open diff.

Things to do before the car arrives

  • Sort out new garage, i've rented one starting 1st december, have plenty of space in my own one for the bits if needed, but would like to have everything ready for the car arriving. Before I can use the garage I need:
    • to get the floor painted, I plan on using good quality epoxy, my current garage is so dusty I hate working in it as I come home covered in concrete dust and it gets everywhere.
    • Some shelves and a workbench. My garage is tall and relatively wide so I plan on putting a mezzanine in, and some tall industrial shelving. At the rear will be a workbench, toolboxes and pillar drill.
    • Sort out lighting, air hoses, and power feeds so that i can actually get some work done.
    • Install the car lift if I have one by then.
  • Order the bits I need for the first part of the build, this will leave me with the rear of the car almost at rolling chassis stage. To do this I need:
    • Fuel tank and fuel system
    • Braking system
    • Differential
  • Confirm the colour choice with Chris at BGH
  • Check what ends the flexi hoses are coming with, and make sure the brake lines are Copper/Nickel.
  • Find a fuel tank supplier who can make an alloy fuel tank with a swirl pot and the right connectors.

Fury Design

Before I end up going overboard, I thought I'd better think out the design some more before its too late. I did this before ordering the chassis, as I needed to know what I was going to do before I decided on the engine mounts etc. In the end I went bike engine spider with a windscreen.

Here are the gory details.

Chassis
  • IRS Chassis with Freelander differential mountings and Escort Front end
  • Crutch Straps
  • A taller pedal box as my feet are too big for the standard one.
  • Side Impact protection
  • Lowered floor for the driver, this should mean I sit an inch lower in the car and give me better visibility, and lower COG too.
  • Higher Rollover bar as I'm too tall for the current one.
  • Powder coating in Orange. Tempted to also get the chassis plated, Chris mentioned this is something new they are starting to offer. I think it might be too expensive considering the cost of a new chassis.
  • The column mount is raised to give me better clearence around my legs
Braking
  • 3/16" Copper Nickel brake lines
  • Goodridge braided brake hoses
  • Wilwood powerlite handbrake calipers on rear
  • Wilwood powerlite calipers on front
  • Solid grooved disks at the front
  • Solid disks at the rear
  • Wilwood Handbrake cable modified to fit Sierra handbrake
  • Wilwood fast road pads
  • Modified Sierra handbrake
  • Fully in-car adjustable bias bar braking system
  • Pressure switch for brake lights
  • Floor mounted pedal box with adjustable pedals.
Rear Drivetrain
  • Freelander Differential - Later upgrade to torsen 3.2 final drive
  • Modified Sierra driveshafts
  • Sierra Hub Assemblies
  • New rear wheel bearings
  • Rear prop form bailey and morris with cush drive.
  • Quaife Reverse Box
  • Paddel Shift
Front Drivetrain
  • MK2 Escort uprights
  • Raceleda Alloy Hubs
  • New front wheel bearings
Bodywork
  • Full Screen Spider Tub
  • Gelcoat finish in Orange
  • Frenched rear lamps (LED)
  • Smoked headlight covers
  • Windscreen
  • Fully internal bonnet catches (IE, nothing visible from outside.)
  • Mesh grill
  • Mini Wipers
  • Black washer jets
  • Black wiper stalks
  • Black Mirrors
Cooling and Heater
  • Polo Radiator
  • Pacet 11" Fan
  • Aluminum Header tank on bulkhead (Fully pressurized system.)
  • Bleed tee at significant high points. (Header tank will be highest point in system.)
  • Aluminum pipe and Blue silicon hoses used
  • Aluminum T-Pieces (Plastic parts to be avoided.)
  • Heater Unit for de-misting and some heat (ha.)
  • Temperature sender pre-thermostat
  • Temperature sender post-radiator
  • Transit heater bypass solenoid to control temperature inside car.
Instrumentation and Dashboard
  • Carbon Fiber dashboard
  • Savage Switches/Warning lights
  • Stack Tachometer
  • Digidash 2 pro display and data logging
  • Fuel Pressure sensor
  • LC1 Lamda sensor
  • GPS Reciever
  • Input Air Temp
  • Adjustable Fuel Sender
  • Flocked panels where required
  • No gaps in dashboard/interior where possible
Electrical
  • Custom wiring loom
  • Very loud horn
  • FIA Cut out Switch
  • Light bike battery
Engine
  • 2006 R1 Engine
  • Baffled Sump with Tulip
  • Remote Oil Filter
  • Sausage Air Filter (unless can be made to fit under bonnet)
  • 4-2-1 Exhaust Manifold
  • Cat
  • Free flow Silencer
  • Sandwich plate for oil pressure and temperature take off
  • Power Commander
  • Crankcase breather
  • Cold air ducting
  • Uprated clutch springs
  • Uprate clutch plate
  • Accusump
Fuelling
  • 8mm Copper/Nickel Lines
  • 34-40Litre Petrol Tank
  • Compression fittings on all fuel lines
  • RV8 Fuel Pump
  • Fuel Filter
  • Locking aviation cap, top mounted flush with boot with lead free insert.
  • Fuel breather
Roof
  • Side Windows
  • Hood Frame
  • Double duck hood
Seating
  • Cobra seats, or if i fit and they are comfortable, perhaps some light tillet ones
Steering
  • Sierra column
  • New column bushes
  • 2.9 turn quick rack (Escort)
  • Quick release steering boss
  • Light, 10-12" steering wheel
  • I will use the sierra one for SVA
Suspension
  • Nitron Shocks (The consensus is they are worth the money.)
Safety
  • Scroth six point harnesses
  • Manually operated gas based fire suppression system for cockpit and engine bay. Additional pull located on outside of car.
Lighting
  • To be decided

Broken Diff

For a while I've been wearing earplugs in the office, and quite often in the car too, its pretty noisy with the roof down, and with the roof up, it isnt so quiet either. Ayway somewhere on the way to work it must have started whining like crazy, the diff made constant clunking noises, generally sounded funky, which I assumed was due to the clutch or torsen unit.

On leaving the office it sounded like a tractor with a straight cut gearbox, I was amazed it made it home. Upon removing the diff (Diff bolts to PPF were tight, everything else came off easily) and examining it, a tooth was missing from the pinion gear, which I found at the bottom of the casing. Everything else seemed ok, but obviously this wont happen on its own. I suspect bearings have worn out allowing too much lash.
At first, couldn't find anything broken until slowly rotating it around i noticed the missing tooth. Nothing obvious had fallen out when i drained the oil, but a scrape around the bottom of the housing revealed the missing tooth:
There was no other broken bits I could see. I got a new diff from Autolink in the UK, its a 1.6 viscous LSD, it works well and is more predictible than the torsen, but with much less power on oversteer at the loss of grip of course. I now find the inside wheel spins quite a lot when exiting tight corners hard whereas before i would get the full power down or slide gently out. Its completely silent though, no clunking so far which is a big bonus.

The Fury

In the end I have chosen a Fury, from BGH Geartech, having had a look at a few, and been driven around in one I decided it was a great compromise for what I was looking for. The fury has the styling that I was looking for (Although I think the rear is better in the Phoenix.) its well priced, and it does remarkably well in the RGB series. Overall I'm a big fan of the Phoenix, and having seen a few in the flesh, I was tempted, but the lack of windscreen put me off, and its a bit smaller than the Fury too.

On the 1st of October, I placed an order for the chassis, I have decided on an IRS chassis, but with escort uprights as they are lighter, and have better caster/ackerman angles. I have chosen a freelander differential too as the ratio is better. Worst case scenario, I will revert to Sierra one if it fails. I think it should be OK though. I can also uprate it to a quaife torsen differential if needed.

For the initial order I have ordered:

  • IRS Chassis with Freelander differential mountings and Escort Front end
  • Crutch Straps
  • A taller pedal box as my feet are too big for the standard one.
  • Side Impact protection
  • Lowered floor for the driver, this should mean I sit an inch lower in the car and give me better visibility, and lower COG too.
  • Higher Rollover bar as I'm too tall for the current one.
  • Rear Drive-shafts
  • Bias bar breaking system
  • Brake-lines and braided hoses

This should enable me to get the car well on its way to being a rolling chassis. Before I collect it, I will need to get some bits from a breakers yard such as drive-shafts, and hand-brake so that they can be modified.

Kit Car Requirements

Here are some of the requirements I wanted from the new kit, there are a lot more reasons, but these are ones which I actively looked for:

  • A lightweight, Colin chapman-esque sports car: Simplicate, then add lightness. I'm looking for a very light car, I don't need many creature comforts, but it should give me some basic comfort, everything else is surplus to my requirements. It must be very focussed.
  • Four seconds for 0-100Kph. Acceleration is very important, it comes generally through lightweight design, this is a very important target though, as it will make it one of the fastest cars around.
  • Max speed at least 180Kph. My MX5 is electronically limited here, and to be honest i rarely get the opportunity to drive this quickly. What I want is something that is fun at slower speeds too.
  • Driveable on the motorway, I may use this car to go to work and back, so it must be capable of cruising.
  • Very lightweight ideally no more than 500KG with me in the car (I weigh 120kg, so its going to be tight, or i need a diet.)
  • Two seats. I don't want a single seater.
  • A screamer, or a thumper, nothing in between. So in a nutshell its a bike engine, or its six or more cylinders.
  • It should look like a sports car. I don't want something that looks like a super car, nor do I want something which looks mundane.
  • It should be functional, but also cosmetically elegant.
  • It must have a windscreen, whilst I'll probably wear a helmet regardless, its nice not to have to, and despite the aero screen making a big difference, there is too much wind at higher speeds, and with a helmet i end up with a red forehead after a few hours due to the pressure.
  • I must be able to use the car in most weather, so the option of roof or hardtop should be an option. A heater would be nice in the winter time.
  • It should be a proven design I've built one car from existing design and de-bodged most of Mr Champions dodgy bits, it would be nice not to have to do it a second time around.
  • I must fit comfortably. I'm quite a big bloke with wide shoulders, i need something relatively spacious, especially if its got a body to go on.

New Project

I've been looking at a new project for some time now, the seven is as good as its ever going to get, the wiring is now perfect, the engine rebuilt, the suspension sorted, and the dashboard looking good. The body work is a bit tatty and could do with a respray, but there isn't much more I can do to improve the look and feel of the car greatly, so its time to start enjoying the driving, and start another technical project. I have considered a number of options which I have considered, discussed in more detail below.

TVR Tuscan Speed 6
When these first came out I thought they were horrible, then I actually saw one and thought, 'oh its not so bad after all.' One went passed me on the M6 I guess pretty much at V-Max and it sounded good and i thought, 'Actually, its quite nice.' Then I had a go in one, and I came out shaking with a grin from ear to ear, and decided 'Its one of the best cars I've ever driven.' However, its a TVR, so it isn't cheap to begin with, (But hey, 0-60 in four seconds, 180ish vmax) but its still a TVR, and I do not have a spare tow vehicle.


Also, for that kind of money you can buy a second hand DB7, and lets face it, I'd rather be James bond, even if I am getting a tow home, than some bloke in a rattly sounding sports car. In the end I decided to look for some crashed ones, and whilst they come up, the work involved doesn't interest me all that much. I can't spray paint to save myself, and I don't really have the patience for sanding down bits of fiber glass, so I'd have to spend quite a lot of cash repairing one. So that idea is out until I get some tax refunded to me. Insurance was quite cheap though at 350Euro/yr, and road tax is cheapish since its still a lightweight car. But right now, its just not going to happen.

Older DB7

Its a DB7, I can pretend to be James bond, and for under 20kGBP who wouldn't buy one. Then I decided that really I'd only be happy with a DBS, or maybe a vantage, but really, its a DBS or nothing. So I guess I'll have to work a bit longer for that one. Besides, I'm too young for an Aston, and it would get keyed if I parked outside my house for more than 30 seconds, if the F430 or the Maserati Gran Sport parked nearby are anything to go by, the badge wouldn't last a week before it gets stolen either.

Sports Coupe/Roadster/GT Car

Did consider Porsche boxer for a few seconds, but everybody has one these days and they are plain boring, I have an MX5 as my daily driver, and a Seven for the weekends, I want something that is different, much more raw than an every day sports car. The MX5 is pretty soft, I don't want any real creature comforts in this car, and I want something I can get my hands dirty with.

R1 Powered Mini Van

Quite like the idea of a van, mainly because it would be a bit of a street sleeper, and still practical (2 seats, plenty of parts hauling space.) easy to fix, and very, very good fun. In the end the lack of decent quality van shells (In the NL people rip out the van part and turn it into the estate.) and I'm not sure if I have the determination and sado-masochistic tendencies required for patching up decaying mini shells. There are a couple of good R1 conversions though, some even have a decent reverse which originally put me off.

These also get really expensive over time, as lets face it if your going to tune a mini with an R1, you need to go whole hog. The outside should stay stock, however you need some serious brakes, updated suspension, steering. I'd also want a trick interior, then of course you need to shed weight big time, so that means Perspex windows, lots of fiber glass. Excellent fun, but not what I'm currently looking for.

Space Framed Imp


Another street sleeper, subtle on the outside, rocket on the inside, but would have to be much, much faster than standard, and space framed imps are like hens teeth.

Morris Minor


I am in complete awe of the beardmore brothers, one of my favorite British cars, have been considering fiat twin cam conversion, or perhaps VAG Turbo conversion, this is quite likely to happen as a side project I think. I like the idea of doing a seriously custom Minor, possibly space frame, but more likely just lots of chopping of the original chassis.

Kit Car


Not another Seven, when my current one rots, or gets bent, I'll buy an MNR, its that simple. However there are plenty of other kits which I like. Ultima - lovely, but over budget for me, cobra - dream car, but V8's are expensive to run, and lets face it, a pinto powered cobra isn't a cobra. I wanted something full bodied, so Fury, Phoenix, Ginetta, there was loads to choose from.

I looked at quite some detail at the Ginetta, Fury, and Phoenix. The Ginetta was a bit too plug and play for my liking and in the end it came down to the Fury, or the Phoenix, but of course Gardner Douglas, an XTR, and a few others were lurking in the background, so it was time to do some high level requirements.

Sunday, September 7, 2008

Re wiring

At the same time as making the dashboard I rewired the car, there were a few reasons, the main one was just to get it all tidied up, since I originally wired it, i've added some basic data logging gear; luminition, then replaced that with megajolt; immobilizer; cut off switch and an intercom, so there was lots of random bits of cabling running all over the place.  I also didn't do a very good job of the original wiring.  

I originally bought an off the shelf sierra Loom from Premier Wiring, its a pretty good loom, but there were some issues which I didn't think of at the time: The sierra loom is a bit over the top for my requirements, I don't have a windscreen, let alone windscreen wipers; Nor do I have a heater.  The lights are predominantly low power and the switches can support relatively high currents so I don't need so many relays.

When I fitted it, I made a number of flaws, it was very hard to remove the engine as the loom wasn't easily disconnected; the ammeter read current usage, rather than charge which is more interesting to me and the cable runs where not long enough at the rear which meant it was messy.

I decided again to buy an off the shelf loom, and this time went for a generic lucas one from Premier wiring, it doesn't have any relays for lights, has a single flasher relay, and is pretty simple really.

I cut out the wiring for everything I didn't have before I started, and added some additional wiring for the accessories.  In addition, I wired up the immobilizer and megajolt as one unit, and left the tails ready to wire into the loom.

This time around, I decided all joints where going to be crimped, soldered, and heat shrunk where possible.  I never trust crimped terminals as I can never get a decent crimp for some reason, well I'm sure its fine but when I trip over the cables or try to lift the engine out of the car when its still connected, it annoys me when i pull all the cables out.  No chance of that happening this time though.

The only thing I would like to do differently would have been where I mounted the main loom, it would have probably made more sense just to mount it to the dashboard so I could lift out the whole thing rather than adding so many sealed connectors to the dashboard.
 
I used a thin bit of MDF to mount the megajolt, and the main loom to, one because it was easy to do this off the car and screw it in, but also if anything melts, or gets squashed it wont hit anything metal which reduces the risk of messing up the whole loom.

I also got a new lightweight Gel battery, I'm not convinced its got enough cranking amps, but the salesman seemed to think so.  If it does, then its about a quarter of the size and weight of the sierra sized battery.


Saturday, June 21, 2008

New dashboard

Its time to make a new dashboard, i was never happy with the old one for a number of reasons; it was made in a rush so was messy, it was covered in scratches from where i've been careless fitting it or other bits, and I can't see all the warning lamps due to the steering wheel being in the way.  I also wanted a dashboard which looked more fitting for the type of car.

With my first attempt, i didn't really have the time to think about the design, it had to be ready as soon as I could glue it together, so it was pretty much thrown together.  With this attempt I wanted to design out the problems I had with the previous one, and also create a well designed dashboard for the car.

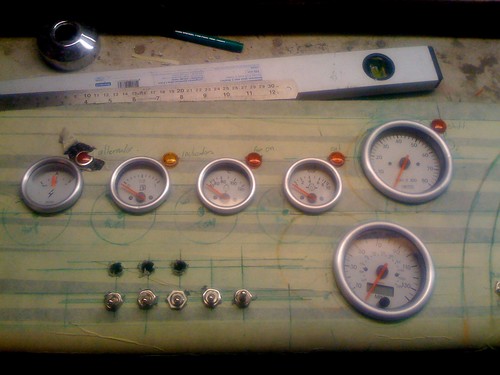
This time round I wanted to lay out the dashboard in such a way that the important things would be the most visible, therefore the rev counter is the nearest thing to my line of sight.  Then (Due to the cost of speeding tickets)  The speedometer, oil pressure gauge, temperature gauge, fuel gauge and ammeter (Not really needed but its nice eye candy.) 

The first instinct when seeing a warning light come on is to look at it, so I wanted each warning light to be next to the relevant gauge.  To reflect this, the shift light is next to the rev counter, and close to the red line.  To make it look consistent i put the other warning lamps at the same position relative to their gauge.   I put the indicator warning light next to the fuel gauge - I don't have a low fuel warning light - if i get really forgetful or too lazy i have a reserve tank anyway. There where two reasons for this, the first was aesthetic - a missing warning light would look a bit strange, the second was that with all the noise and other things going on around you, in a car like a seven it is very easy to leave the indicator on by accident and there is no chance of hearing the tic tic from the flasher relay.

I wanted a more clean looking dash/control area so i wanted rid of the column switches, also as they tended to get in the way of my fingers when i was spinning the wheel, so toggle switches are used for everything except the horn.

I wanted a consistent colour scheme - no longer constrained by the SVA requirements on pictures and tell tales, i decided on a green light good, red light bad approach.  Things which are red indicated something wrong, like on the rev limiter, or no oil pressure.  Orange lights are for things which may require attention - like I've left the indicators on, or the engine temperature is high (The cooling fan is on.)  Green lights are notifications - lights are on, other eye candy.

For the most part I wanted to have the minimum I need, I wasn't going out to rival a japanese street racer, but I do have some eye candy.  I use megajolt for ignition, so i decided i'd have a start light above the start button - I'm not sure why i wanted this, the practical reason is that sooner or later I'll need another light and in the mean time this is an allowable amount of tat. In a nutshell the megajolt lights up a green light next to the start button when the revs drop off.  Its cheesy but I like it.

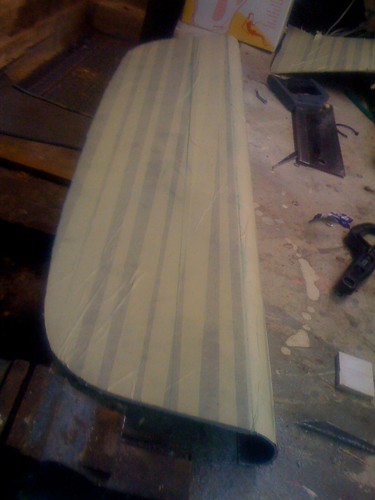
I bought a carbon fiber blank dash from Carbon Mods, I wasn't that bothered about the weight saving, but their stuff looks the dogs danglies whenever I've seen it on a car, so decided this was a good start.  The price also should enforce that I take my time and don't screw it up on the first cut.

Having no power in my garage, and it being a way away from my house, i decided to clear out the basement and use that as my workspace.  The first thing to do was try to get a clear space to lay things out on - i sanded down the desk a bit and made sure there was nothing there to scratch the surface as my previous dash had loads of chips and scratches from me being careless.

Just to make sure I covered the whole thing with masking tape, this not only stops the drill slipping and me scratching it with a knife,  but also gave me something to mark out the design on.

First off I made a template from the previous dash board, this should ensure it fits snugly, and it allows me to get the holes for the steering wheel just right.  I also marked out the line of sight and the steering wheel position so I nothing would be out of sight, and that the dip/indicator switches would be within reach.

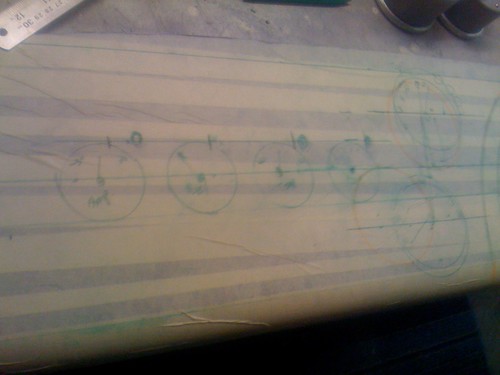
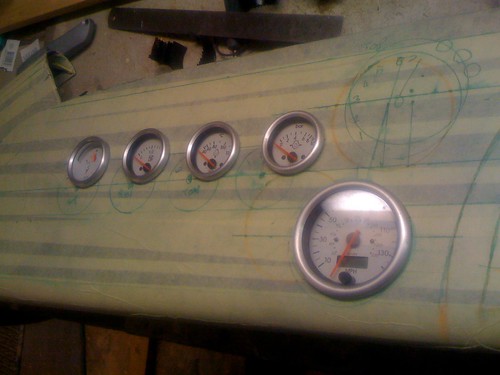
I knew more or less how I wanted it to look, ignition/starter on the right, normal switches in the middle, and the gauges laid out in a sort of heartbeat shape with the rev counter and speedometer staggered off the horizontal center.

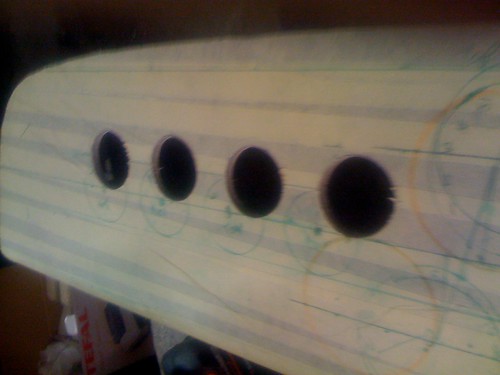
It took a bit of playing around with the height and angles to get the proportions right, then it was time to start cutting.  I started first with the smaller gauges,  I used a hole-saw for these and then a half round to bring them out to the required size. For the larger gauges I chain drilled using a 3-mm drill and then filed it out to fit.

Then I drilled the switches and lamps, and flipped it over for the wiring.  I was never happy with the original wiring as there was far too much of it, and it was not really wired to fit the dash which meant it was a loosing battle to begin with, so this time, every wire is cut to size, and there are no wires there which are not required by the loom.  I also used common earths and lives where possible eliminating the need for a dedicated wire for each item in many cases.

Cover in tape and cut it to the right size based on the old one.

Mark out where things should go, i had to play around with the angles once i actually saw it on the dash.

Using a hole-saw and then filing out to size I made the holes for the smaller 2Inch gauges.


The larger guages where cut out using chain drilling then filed up to size.


Starting to come to shape now, with a hole for the steering column to go through.  On the right are the switches for ignition and start.

From Right to left - Tachometer, Speedometer, Oil Pressure, Water Temperature, Fuel Level, and Ammeter. Each warning lamp is positioned next to the relevant gauge, except for the indicators which is next to the fuel gauge.