Friday, August 27, 2010

Floor Finished

I fitted the rear diffuser today, it runs the full width of the car, and starts at the rear bulkhead running flush with the rear of the bodywork. Its bolted on with M5 rivet nuts, however as it should be an aerodynamic aid providing some downforce, i wanted to make sure it didnt flex. I've added three tubes bolted in place at the rear to pull down on the bodywork. The look is growing on me, at first it looked a little bit to MaxPower, but its wearing off. As it will count as above the floor line, it needs to have a radiused edge, so i've added some U trim to protect mr IVA man and his delicate little fingers.

Fully flat floor now in place

At the front I fitted a bit of right angle aluminum to eliminate the gap between the bodywork and the floor, you don't notice it, but I want to force air in the front of the car through the nose, not through the floor where possible. I added some U trim around the aluminum floor to protect me and my delicate little fingers.

SDC10394

I removed the sidepods and cleaned up all the dust in them, and bolted down the bonnet clips. It took ages to get a good shut line again after I put them on, so I hope I don't need to do this too often. The floor is now complete, and I think it looks pretty good.

Inside I fitted the heater hose, I then decided there wasnt enough air coming out the vents so added another hose at the other end which required some cutting and shutting of the fixtures and fittings, but now provides a bit of a blast when the fan is on.

I added a T-Pull handle for the fire extinghuisher, its within arms reach under the center console, but well out of the way in case it gets pulled accidentally.

SDC10447

Friday, August 20, 2010

Wipers and Intercom

Fitted the windscreen wipers, these have a 95 degree sweep, so I've mounted the offside one just to the right of the steering wheel center, and the other about 5" to the left of where the tip of the blade finishes. Finding the position was easier than I expected, using a protractor and the arms and some tape I put them in various positions and checked that the were not missing anything in my field of vision.

SDC10373

Fitting the wheel boxes to the motor on the other hand was endless frustration. The theory is simple enough, there is a corrugated flexible bit of wire that runs through some copper tube from the motor to the wheel boxes, the wheel in the wheel boxes is turned by the teeth on the wire, the wire is pushed and pulled by a crank on the end of the spindle.

SDC10388

I measured and cut the tube, and used a mandrel to bend it into the right shape, offered it up to the wire, and of course, it didn't go in. The wire is about 8mm, as is the ID of the copper tube. I de-burred the edge, and tried again and it got as far as the first bend, where of course it was too narrow to go any further. I spent a good few hours trying smaller radius bends, before finding another roll of ever so slightly larger tube that allowed at least some movement.

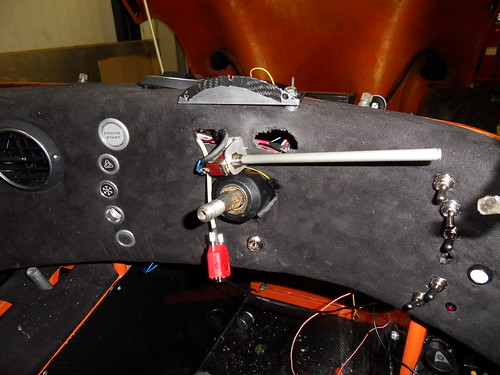
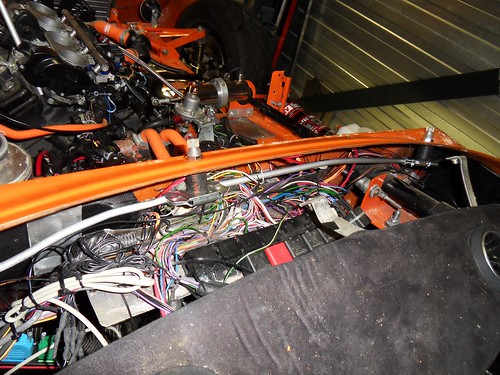
I then flared the end, before noticing that i hadn't put the nut on yet, after remedying that I offered up the rather inflexible assembly to the wheel box. This is located under the windscreen, above the electrical tray. It fits in there with a bit of bending, but removing the nuts on the end require the patience of job. These nuts are used to clamp the copper pipe in place, the wire then goes through the wheel box, and into another section of copper tube. I spent a good hour wiggling, and eventually managed to get the wire to pass over the lip on the clamp, another eternity tightening it up, before i (thankfully) had the good wisdom to test it worked, because as soon as i pressed the button the fuse popped. Tried again with a slightly larger fuse, and it pushed the flare out the motor end, i yanked on the wire and it was locked solid.

I assumed this was down to the cable being crushed, but after removing it, it was obvious that you have to thread the wire through the wheel box, as there is not enough of a gap for it to sit home if you don't, so basically when i tightened up the clamp i was just locking the wire in place.

I decided at this point, that things were getting too complicated, so i decided to use 10mm ally tube, and move the motor inside the car to eliminate the need for tight bends in the tube, this should allow the mechanism to run smoothly as well as making it easier to fit.

SDC10378

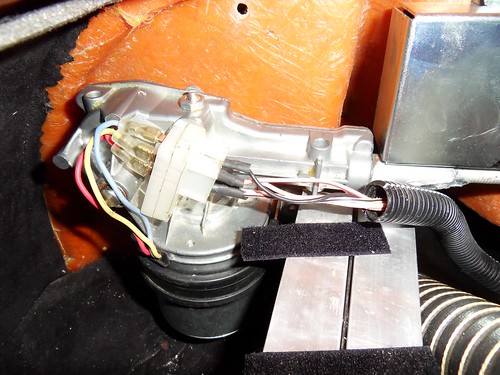
I drilled out the brass nut on the motor to 10mm, and put a flare on the tube, put the nut in a vice and screwed in an alloy boss which sits in the motor housing and is clamped in place by the cover of the motor. Of course i over tightened it and it sheered away in my hand. This was turning into a bit of a bodge, so after a bite to eat, i decided the best option was to make a new boss. (its simply a T shaped bit of metal with a hole in it) I did this by taking some alloy bar, turning it down so it had a lip on it. I then brazed the alloy tube to it using durafix, and some air of professionalism started to return to the finished result.

With it all bolt in place, the mechanism moves very smoothly, and is rock solid, which was pretty much what I wanted. I can now keep myself awake when i sit in the car by being slapped in the face by the wiper arm until I get round to sorting out a windscreen.

SDC10380

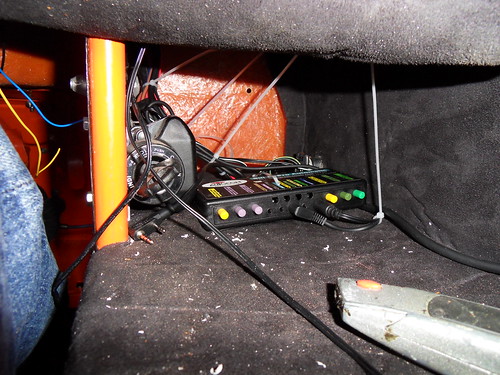
Next job was to fit the intercom. I've mounted it on the sidepod to my right, just at the end of my arms reach under the dash, to make the wiring tidier, i drilled a series of holes in the back of the casing and routed the power, and comms wires out there, leaving just the inputs for the music/gps etc at the front. The wires for the headsets will run along the outside of the sidepod to their rubber mounts.

SDC10387

The side repeaters are also fitted and wired up, along with an indicator switch and working hazard switch (Using a conventional way of doing things.) which will do until SVA, although for some reason my flasher wont flash, i tried a different flasher, and it flashes, but at the wrong rate due the LED lights, so i've ordered a replacement LED flasher unit.

SDC10412

I made a very crude, and tbh not very good shift lever by extending a momentary on toggle switch with some alloy tube, this will do until I get rid of the ginormous sierra steering wheel (Post IVA) and can fit a proper flappy panel wotsit behind the smaller momo one.

SDC10384

Fury Todo List

Its mainly little jobs now, in no particular order these are:


  • Interior
    • Fit the dashhboard
      • Mount the dash
      • Mount the T-Pull handle for the fire extinguisher
      • buy and fit a working flasher relay
      • Fit (Temporary) buttons for dip/mains and horn
      • Make and fit temporary shift lever
      • Fit the heater hose from the dash to the heater
      • Fit the heater hose from the heater to the driver footwell (Exhaust should keep the passenger warm.)
      • Fit a working switch for the heater fan
      • Fit the intercom
      • Order and fit switch for wipers
    • Stick down carpeting
    • Carpet around the windscreen aperture
  • Engine:
    • Make an airbox to get through SVA
    • Adapt existing air filter to sit 180 degrees from its current location and make hole in bonnet
    • Remove AIS system and turn it into a breather system
    • Order and fit a catch tank
    • Change the O-Ring on the sump for a yamaha part
    • Order and fit alloy tubes as current ones seem to be porous
  • Bodywork:
    • Glue rear lights in place
    • Use some PU to fill any gaps
    • Fit front air dam
    • Buy and fit some mirrors
    • Wash clean and polish
    • Buy and fit rear diffuser
    • Fit side repeaters
  • Windscreen:
    • Buy and fit windscreen
    • Fit windscreen wipers
    • Fit washer nozzle
  • Brakes:
    • Set the brake bias
    • weld up the bias bar for IVA
    • Remove the bias bar adapter
  • Wheels
    • Balance the wheels as a couple of the sticky weights came off
    • Fit all the wheel nuts, and cut down the front studs if required
  • Suspension
    • Book and appointment to get suspension set up and corner weighted

Bonnet pins and rollbar

Bonded in the bonnet pin mounts to the side pods, but i think it will need to be bolted, i'll bolt them in at a later stage when i have a good reason to faff with the side pods.


Put a final coat of black on the roll bar, and bolted it in only to find out i'd ran out of m10 nylocs, managed to find one, which is enough to hold it in place, with the other bolts just screwed into nothing. Will pick some up on Monday and finish the job.

This didn't stop me from adjusting the harnesses and fitting them, with the adjusters in the right place they are a lot more comfortable and of coarse, a better fit, whilst very comfortable the seats are tight to the bone, to the point i can actually feel the seatbelt through my jeans. Must lay off the pies.


I spent the rest of the evening tidying up the garage as i hadn't really put anything away since before I left for spain. The seven needs some post-trip-love, or at least a wash, so i might try to get started with that tomorrow. Its dripping oil on the floor so i'll put of washing the floor (which is now a little slippy) for a bit longer, or until i slip and crack my head properly.

Next up in the fury is to finish of the electrical parts. Until I can get a circuit board manufactured for an affordable price, i'll use a normal toggle switch for the indicators. The hazards need to work with the ignition off, which presents a problem, with the ignition off, and key removed, i can turn on the hazards, this is run from a permanent live feed. However, the indicators, work from the ignition feed. If i have the hazards on, and turn on the indicators then the ignition circuit is live too as power can flow back up the feed from the ignition circuit. I'll put a nc relay in there to cut the power for now. I also need to find myself an on-on-on dual throw toggle switch for the wipers, for now i'll just leave the wires ready to attach.

If all goes well with the wiring i'll have a go at fitting the wipers.

10% of the progress, 90% of the time

I'm down to the predominantly little jobs. I picked up the shifter arm when I was last in the UK, so I fitted that to the flat-shifter solenoid,


I need to finish the wiring, and there is now nothing in the way of this, so i've been out with my soldering iron, loom tape, and zip ties. The engine bay is now complete, with the flat-shifter-max wired in, and connectors ready for the rest of the flat-shifter post IVA.

All the engine loom is tidied away nicely, however I think i will need to make a support for the bike loom as its a little too short to sit on the bulkhead nicely.


Next up was the bonnet catches, these are aluminum cases with locking pins, these look pretty nice, and are strong enough, however the bonnet has a pretty poor fit around the side-pods, as the pins are not locked, I think they may end up coming loose due to the side pressure.

To stop this happening, i've bonded and riveted in some plates to the bonnet, the plates have a pin in them which goes vertically through the side pod, this keeps the bonnet in place horizontally, whilst the locks keep it in place vertically.


Next job is to fabricate the mounts on the sidepod that secure the bonnet to the car.

Sunday, August 1, 2010

Trip to Zeeland

It was sunny so I went for a drive in the seven with tunerstudio running to see if I could improve things, I couldn't but the drive was lovely.

SDC10193

Basically, there is not enough variation in MAP pressure, and the rate of change is very steep off idle with no change at higher rpm. This means that the VE table is pretty flat.


Subsequently, I changed over to TPS based fueling, the result is a much more responsive drive, throttle response is like lightning in comparison, and it feels and sounds like its set up properly. The AFR is much closer to the AFR target. I've only ran autotune for about an hour or so on what was a relatively quiet drive, so the edges are not tuned yet, but for the most part its pretty close. Its certainly very drivable


Whilst I was trying to get Alpha-N working I hit a few idiosyncrasies in the tuning software. There are three fueling options for megasquirt: Speed Density; (MAP Based) Pure Alpha-N; (TPS Based) and Blended.

For now I'm using Pure Alpha-N, however when I set the fueling algorithm to Alpha-N in either tuner studio, or megatune it was still using MAP for fueling. For whatever reason it was using the blended algorithm. This seems to be not a bug, but slightly misleading name, Pure Alpha-N is essentially blended, but starting with Alpha-N rather than MAP. Therefore I set the Threshold to 9k in the Alpha-N blending dialog.


In addition, I had ego correction active at idle, this results in an idle which falls and rises all the time, setting EGO correction to be active above 1200 worked a treat.

Seven engine rebuild (again)

Well after a disasterous start to the year, it was time for a new engine. The root cause of the failure was the lubrication system possibly caused by a blocked oil cooler.

I got a short block from Jem Engines, its a 711 crossflow bored out to 1700cc, with fully balanced internals. The engine is fitted with ARP con rod and fly wheel bolts. I reused the Kent 244 cam, and burton stage 3 head.

The first thing to do before building anything was to thoroughly clean the head, as the bearing failure had likely resulted in a lot of crud going around the engine, I stripped it completely and used pipe cleaners to go through each oil passage, and cleaned it with gunk degreaser and compressed air.

Afterwards I painted it black (it was blue) to match the block. I used hammerite and so far it seems to be doing the trick.

IMG_1406

Next was time to do the ARP bolts, Eric gave me some ARP Lube, so I torqued them up to 40 ft lbs.

SDC10137

I can build a crossflow in a couple of hours from memory alone now, I could even remember the number of degrees to set the cam to, although this didn't stop me from making a hash of it the first time and having to re-time the engine after everything was built up.

SDC10141

I used a competition gasket set from Burton, Eric recons the best way to get a dry seal on the sump is to evo-stick the gasket to the block, then use a little blob of silicon around the rubber seals on the end, and tighten it up gently.

SDC10144

I tried this, the result was an enormous oil slick on the garage floor after the first drive so I'm back to experimenting with silicon... The engine was back in the car in less than 4 hours, ready to start, or so I thought.

SDC10145

It fired up first time, but made a noise that left me clutching my wallet.


It turned out that the oil pipe was ever so slightly grazing the con rod bolt, this thankfully was easily fixed with a gentle tap from the hammer and it finally ran smoothly. Getting the sump off in-car is a real pain, however if I loosen off the engine mounts and replace the gearbox->engine bolts with longer ones, I can use a crow bar to seperate the engine from the box about an inch which is enough to get to the rearmost sump bolts.

The fury lives

After two destroyed wiring looms I finally got the engine wired up properly in the fury. The trick is to completely ignore the wiring diagram in the owners manual.

The first time, I wired it up based on the colours and connections indiciated in the manual by shortening the loom, and things were very confused. After an enormous amount of faffing i got the ECU to intermittantly function.
The initial loom from the R1
The second time I got exactly the same results but with no functionality by wiring it directly from the wiring diagram. The reality is that there are quite a few additional connections, earths, shared VRef feeds etc, that are not indicated on the diagram, as well as a few circuits for the ECU that are simply missing, immobilizer for example.
CIMG0726
What I did in the end was wire up ll the sensors, get the ecu to report fault codes, and work as expected, then on at a time removed things that were not connected up to anything. This left me with a minimal loom, including relays, fuses etc. I then followed each wire to the fuse box, and cut it at the fuse box end. The cut wire was then re-routed, and extended/shortened as required to the engine feed wires.

Each time I did this, I turned everything on and made sure that things were still functioning, this made it easy to find any problems if I introduced any.

The result is that I now have a handful of wires coming out of the bulkhead to power and control the engine, these are tidily spliced into the engine loom which also goes through the bulkhead to the ECU.

The end result was that I could start the car, it fired up first time, with no fiddling which was just what I'd hoped for. I let it tick over for a while checking for bad sounds, leaks and any problems.

Things got pretty smokey as the heat wrap burned off all its chemicals, but settled down nicely, the side pod gets pretty hot, above the manifold where there is no heat shielding, but stays pretty cool everywhere else which I hope will be fine. I think I will make another hole in the rear of the pod to let the air out when driving though.

Hans came over so we fired it up again and had some fun with the loud pedal.


Since then I've taken it for a quick spin around the garage car park, this is going to be great when its on the road.