Wednesday, December 30, 2009

Interior Trim

I started with the interior trim in the Fury, anything that I'm likely to come into contact with, which is basically the horizontal panels on the inside are lined with foam sheet, and then covered with Alcantara. The other visible panels will be covered in Alcantara.

Progress is quite quick on this, but I've run out of glue so no more progress until after new year.

IMG_1115

First I cut the foam to size, then covered the foam in Alcantara. For removable panels the aluminum was bonded to the foam, however where the foam fits up to the GRP I will use velcro or trim fasteners to hold it in place.

IMG_1114

Once the foam was cut to size the alcantara was then attached to the foam using contact adhesive.

Starting to cover the interior in alcantara

The Alcantara has a very nice feel and I think it is a good contrast against the orange tubing.

Engine Rebuild

I stripped the crossflow into component form, leaving the pistons and crank shaft well alone though. The bores are showing no signs of wear, but there was rather a lot of carbon deposits. I de-coked the engine as best I could and cleaned it thoroughly including the oil channels and water galleries. The kent 244 cam was installed and timed, using a timing disk.

The short block and components ready for rebuild

Quite a lot of crap on the inside, but no leaky head gasket, bores are in good shape.

I'm starting to see mild valve seat recession which is alarming, so I expect that by this time next year I will need to have new seats fitted, at the same time I will fit hardened seats which mean I can run pure unleaded. I may use this as a chance to rebuild one of the spare blocks and heads to give me a running spare.

There is some valve seat recession present, next year i'll probably get the head converted to unleaded

I fitted new valve springs and fitted stem seals, the originals do not fit as they foul the internal spring, ones from an MG metro do fit however so these were installed. I fitted a new rear oil seal and gaskets and should hopefully now have a leak free engine.

All bolts where assembled with threadlock. I also fitted a T-piece in the top cooling hose to insert the Coolant temperature sensor for the microsquirt box.

Alternator bracket lockwired as well as thread locked - Course threads are a real pain...

I must now weld up the sump, or find a new one before putting it back in the car. Once in the car i'll need to run it at 2500rpm for about 20 minutes to run in the new cam, and at the same torque down the head again.

Lockwiring

I'm pretty sure I don't need to take the prop shafts out now, so today I fitted the bolts for a final time. This is something you want to get right, as the prop shafts turn at very high rpm. If they come off, the end that comes off will flay around. This is a bad thing. Sometimes its just a case of new panels, other times it can sever the fuel lines causing the car to catch fire or if it breaches the floor, the car could be jacked up, causing it to rollover, or if it breaches the panelling into the cockpit it can cause injury to me or a passenger.

Bike engines produce a lot of vibrations and this has a habit of causing things to loosen off. In addition, there are two prop shafts, and a sprocket adapter which is three times as many things to fall off as on the seven.

My plan therefore is to use three things to stop the bolts coming off:


  1. Tighten the bolts RFT.

  2. Use threadlock on all bolts

  3. Use lockwire or a locking tab on all bolts.


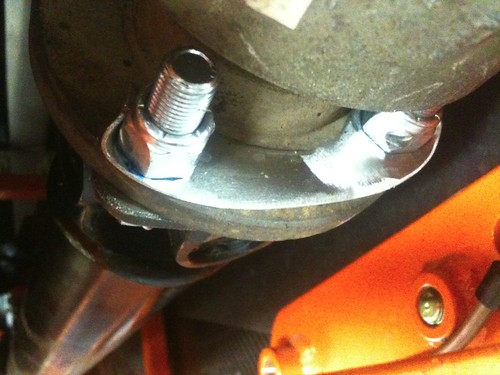
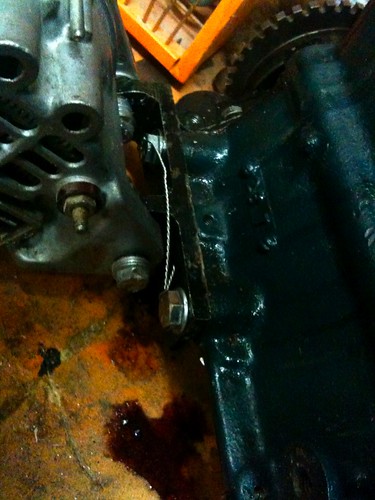
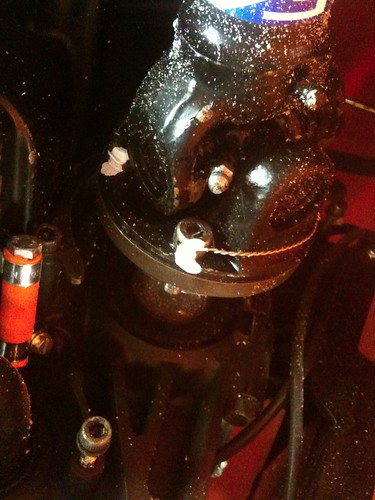
The sprocket adapter bolt is a tricky one, as it is enclosed by the prop and the adapter, this is tightened to 86nm, with locktite, and it has a locking tab which i've hammered down. The problem is however, that I cannot see this bolt visually to check periodically. What I will do initially is retighten it after 100 miles, if it is loose then it will just have to be done regularly or i'll drill a hole in the adapter and lockwire it. To give me an indication of any movement, I've put a line of paint at the joint, if the bolt is coming loose there will be a gap (however small) betwen the line of paint and the adapter which should give an early indication. The bolts are M8 cap head grade 12, and are tightened as tight as I can get them, threadlocked, lockwired, and marked.

All prop shaft bolts are lock wired and marked

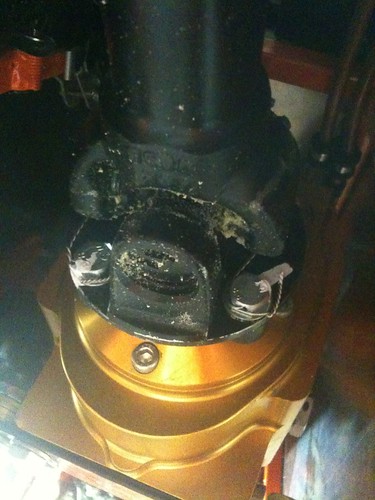
The reversing box uses M8 bolts, these are grade 12, and tightened as tight as I can get them with the spanner, again threadlocked. These are lockwired in pairs and marked with paint.

All other bolts are lock wired and marked.

The rear flange uses nuts and bolts, again grade 12 bolts, with nylocs and threadlock. I've lockwired the bolts and used a locking tab on the rear which is bent over the nuts to stop them turning. Again they are tightened as tight as I can, and marked for security.

Rear prop shaft bolts are lock wired, and also have locking tabs made to stop the nuts turning.

Monday, December 28, 2009

LC-1 Permenant Installation

As part of the upgrade to fuel injection, I am installing the LC-1 permemantly. Right now I have installed it in a plastic box with the guage and a 12v lead so i can plug it into the auxiliary power feed when I need to monitor Air/Fuel ratio. This has worked well as there is nothing you can do to the carbs when you are driving other than observe the readings in order to make changes later.

Megasquirt however, is capable of real time mixture adjustment using the EGO code and a wide band O2 sensor. This combination allows megasquirt to adjust the AFR (Within preset limits) towards a lambda target. I want to make full use of this as it should make tuning easier as well as providing better running.

The first part is to install the LC-1 Permenantly, to do this I need to mount the unit itself behind the scuttle. I've made a bracket form a bend strip of aluminium which is screwed onto the bulkhead. The tails for the communications bus are cable tied out of the way, and the main lead is fed towrds where the megasquirt unit shall go.

Lc1 mounted in a aluminium bracket on the bulkhead

In order to link the LC-1 and the wideband o2 sensor. I've made a hole about 3cm in diameter through the side panel just underneath and slightly in front of the bottom of the dashboard. This allows the 22mm diameter nut, and the body of the sensor to pass through (These are smaller than the connector at the other end.) In order to seal it all up I've used a large grommit, the whole of which was too big for the cable, so I used some corrugated cable wrap to finish it off. The cable is then cable tied in place up to the LC-1 so that it should not get snagged.

Mounted the sensor in the exhaust with the tail going into the foot well.

I have left the guage in the box with the power supply. This will enable me to get a visual indication of AFR when driving as needed as well as the option to recalibrate the sensor if I need to without a laptop. For everything else the 2.5mm jack is easily accessible with the dash on to connect up to the laptop.

Thursday, December 10, 2009

Radiator Mounts and Ducting

The radiator mounts were too flimsy, this caused them to fracture. The old ones where riveted in place and made out of 2mm steel with no bracing. I removed the ones which were still in tact, and made some new ones out of 6mm steel strip, welded in place. They form one complete mount per side rather than four individual ones and are a good bit stronger than before.

CIMG1178

The car was getting very hot in the desert at speed, so I replaced it with a new one on the assumption that the damage done by the fan bending the fins was restricting the air flow, time will tell if this really was the problem or not. At the same time I moved the fan behind the radiator, using the solid mounts rather than mounting through the radiator, this means the fan is very close to the radiator which should aid cooling when stationary, and it also overlaps the oil cooler slightly which should have an additional benefit.

CIMG1223

To further aid the airflow, I added some ducting around the radiator to force the air through it rather than around it. I'm doing additional work to the bonnet and when i finish that i'll smooth it and paint it.

CIMG1236

Exhaust Wrapping

The exhaust wrapping has been coming off slowly over the last year or so, so i replaced it with new stuff.

The heat wrap had come off the manifold over the last couple of years

Hans suggested that soaking the wrap in water before wrapping would make life easier, and it certainly does. It becomes a lot more pliable when wet, and it stretches, then as it dries it contracts leaving a very tightly wrapped result.

I cleaned it up and it now looks as it should.

Floor Painted

After Morocco, the car is in need of some love. Half the Sahara seems to be inside of the car, so as the weather is cold and wet, I've started with a proper clean.

CIMG1202

I removed the seat belts and anything else in the way, got out the wire brush and grinder and cleaned up all the floor back to painted metal, and in some places back to the metal itself. Two coats of hammerite later its looking pretty good.

CIMG1204

The seats were maukit, so I cleaned them up with detergent, and some vinyl polish, they came up pretty well.

CIMG1205

I Also painted the roll bar, and a few other bits of the chassis which were exposed to daylight and have faded a little.

Sunday, December 6, 2009

Todo

Seven
Engine
  • Fit and reinforce engine mounts to ensure they wont fail in the same way again.
  • Fix or replace sump, either shorten the existing one or just stick a non-battered one on, whichever is easiest. Potentially make a sump guard.
  • Change crank shaft end seal for one that doesn't let oil pour out - some people find a bit of oil acceptable but I find it embarrassing so it needs to be sorted out.
  • Since the engine will be out I want to change the cam, I'm relatively happy with the piper 285 cam, it has lots of torque from low RPM, and reasonable high end power so changing it is a bit of a gamble. I've decided on the kent 244 cam, its a high lift cam, and should give improved top end power, with a loss of low end torque. To compensate I'm going to be running fuel injection, which should enable better fueling at low RPM and pull the torque up a little.
  • Remove cylinder head, de-coke, and examine engine for wear- I'm interested to see the state of the valve seats after 7000 miles using additive, its also a good time to change the head gasket, its got pretty hot a couple of times, and I'd like to ensure there are no failures in the gasket.
Fueling
  • Fit the Mega squirt (Microsquirt) for full fuel injection.
  • Buy and Fit a larger fuel tank - 20 liters just isn't going to cut it, I feel I'm constantly refueling.
  • Fit larger fuel lines with a return to the tank, for fuel injection I will need a fuel return, standard sizes seem to be based around 10mm for fuel feed, rather than 8.
  • Fit the in line fuel filter and buy and fit injection pump
  • Fit the throttle bodies from the GSXR 750
  • Permanently install the wide-band LC-1
Bodywork
  • Remove the scratches from the bonnet, remove the nuts and bond it into one single piece rather than the Sort out the bodywork, fill up the hole where the aerocatch doesn't fit due to the intake system and make it orange again.
  • Make a new boot box, i'll need this because the fuel tank will be a different shape, and wont fit within the current one, it is also starting to rot a little and needs to be made out of something non-wooden.
  • Fit a new drivers side mirror as the current one is beyond service.
  • Paint the interior where the paint has worn and touch up the rest of the car as appropriate.
  • Make and fit ally floor covers
Electrical
  • Accessory wiring needs to be rewired, with heavier wire, and a smaller, dedicated fuse.
  • Decide on a data logging solution that is compatible with the mega squirt
Other
  • APK is due in December.
Fury
  • Fit alcantara cloth I got for the interior
  • Finish dashboard buck and make dash
  • Wire engine completely
  • Fit passenger seat and seat belt
  • Paint and refit roll over bar
  • Make car bottom from ali and fit
  • Fit the prop shafts with grade 12 bolts
  • Fit steering wheel and boss
  • Figure out the dash layout, and the logic design for the indicators on the steering wheel.
  • Figure out the appropriate adaptors needed for the oil pressure/temp senders
  • Decide on the dat logger I want to use
  • Get the rear lights and wire the rest of the car
Garage
  • Fit car ramp, wire in new motor or inverter as required
  • Enlarge mezzanine as appropriate.
  • Do a full clear out post-sanding.