Tuesday, May 26, 2009

Post Stoneleigh Repairs - Cycle Wings

The wings on a seven are a constant headache, there are two common failure points, the first is the metal bracket which runs from the upright and holts the cycle wings in place. Due to bumps in the road, wind and air turbulence, stones and other objects being thrown up from the tires, rain and other debris vibrating the wing, the wing-stay is prone to metal fatigue. The common failure point is at the base where it joins the upright, and at the bend at the top.

The second failure point is is the joint between the wing which is fiberglass, and the stay which is metal. I opted to glue my wings to the wing stay, in doing so I drilled holes in the wing stay to provide space for the glue (PU Adhesive) to key to, I also made the fiberglass as rough as possible, however this started to fail.

Both sides have failed in the same way, the rear most glue has separated from the outside working inwards, the drivers side failed first. I noticed it as it was bouncing around on the way back to cambridge, I did my best to reduce the movement using some cable ties, and inspected the passenger side to notice it was also coming off although not quite separated.

Mudguards are always a weak spot on a seven

The simplest option would have been to apply more glue, but obviously over time this shall just fail again. I could drill it, however that has its own issues, you create a stress raiser that over time shall crack and fail. Instead I decided to reinforce the joint. I cut and drilled some plates from aluminum that match the profile of the inside of the wing, I then mounted these with PU over the metal wing-stay, subsequently there is a much larger surface area for the glue to adhere to. Should this fail in the future, it will be relatively easy for me to bolt the wing to the wing stay through the aluminum. I'm hoping the copious amounts of glue will also dampen some of the vibration (Much like a metalastic bush) and increase the lifetime of the rest of the wing stay. The issue is of course that repairing it now that there is no feasible way of separating the two parts is going to be very difficult.

This is what is holding the mudguard, the wingstay goes through this and this then clamps to the wingstay and the mudguard.

I removed the black plastic U-trim, i originally liked it, as it gave a nice line to the edge of the car, but its started to fade a little so I'll run without for now.

I'm hoping that these will be now a permenant fixture.

Finished by covering in adhesive and clamping in place until it set.

The car was caked so I gave it a wash and a quick rub over with some polish on the front bodywork where i'd been handling it a lot.

After a quick polish to remove my muddy finger prints, its looking pretty good.

Post Stoneleigh Repairs - Exhaust

I've been wanting to do something about the somewhat antisocial amounts of noise coming out the exhaust for a while. I actually really like the sound, its brutal, at tick-over it sounds just slightly angry, but when you hit the throttle its like you've opened pandoras box. There are a number of downsides to this however:
  1. You can't hear yourself think when idle, let alone when moving.
  2. Nor can you hear your passenger
  3. People who can't tell the difference assume your a chav.
  4. I Can't go anywhere near a racetrack
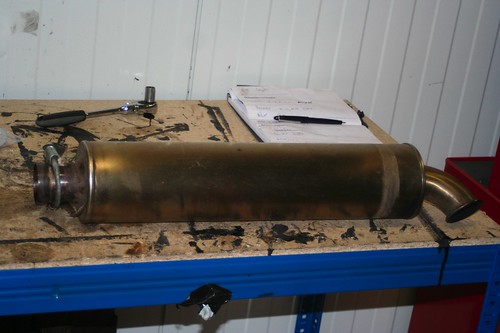
Something had to be done. I bought the original silencer from a chap off LocostBuilders who was (And still is) making them in his spare time. Its about the size I want and the quality is outstanding. Titanium baffle plate, and stainless steel other bits, I wanted to avoid changing it if possible, so decided to repack it.


I wasn't sure if it originally had any wadding, but it did appear to be getting louder so assumed 
that it did at some point. There are also rivets at one end, so thats a good indication. Doing some research, there are basically three possible things you can use to pack the interior of the can. The first is wire wool, being metal it has a fairly good lifespan, its fairly loosly packed, so should perform fairly well, but as a result provides the least sound deadening. The second option is much the same, only using a ceramic wool, this can be packed tighter and has better sound deadening, it also burns out quicker. There is also a matt which is wrapped around, this has better deadening but as its woven rather than loosely packed, has poorer flow.

I opted for a highbred form CBS, its basically a sausage shaped assembly, wrapped around a cardboard tube, the theory being you replace the cardboard tube with your baffle plate, and its easy to apply. It is made up of a layer of wire wool, and matting on the outside. It cost about twenty pounds and was money well spent. It didn't slide on how I expected, but it was trivial to assemble. First removing the canister from the car, I started by drilling the rivets and removing the baffle plate and tailpipe assembly from the canister itself. I took the opportunity to clean the carbon deposits from anything i could reach with an air gun, this was actually a bit stupid because it meant my whole garage was now covered in carbon dust and I couldn't find the dust masks so had to stop for a day until it cleared.

I then unwound the wrapping and wool from the cardboard and wrapped it around the baffle before re-assemby using 3.2mm rivets.

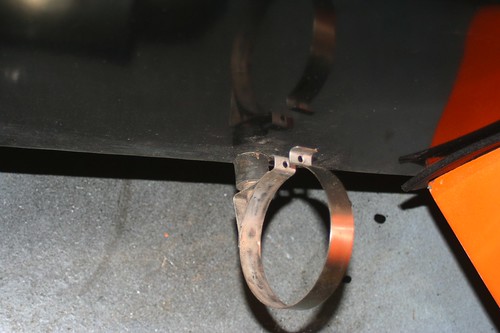
Whilst the canister was off the car, I also fabricated a stronger bracket for the canister itself. Currently it is mounted using a stainless steel clamp bolted to a rubber bobbin which itself is bolted to the car in shear. These are notoriously weak, and this is asking for trouble. The bobbin was in reasonable shape, with some cracking but it was pretty strong. I used a pair of mole grips to get it off as it was pretty tight, so I figured that makes it strong enough to reuse.


I cut some 4-mm aluminum angle bar down to 4-cm, and drilled, countersunk, and de-burred two holes to provide a solid mounting, and another on the other side to mount the bobbin two. I then drilled an additional hole in the chassis and inserted an M6 steel rivet-nut with some PU adhesive to try to seal it a best as possible. I drilled out the holes in the mounting to 7-mm, as my tolerances were not accurate enough to use 6-mm holes sadly, I mounted the bracket slightly lower then the lower chassis rail to keep the canister in pretty much the same location as it was and adjusted the position of the clamp to match the new mount.


The car is much quieter now, I can clearly hear the induction noise which sounds rather nice. The down side is I can also hear the other mechanical noises and now think the car is about to break every time I turn, brake, steer, hit a bump, rev the engine, engage the clutch, or anything that causes any minor mechanical noise. I'll need to desensitize to it again.

The fueling is now of course in need of some adjustment, so I'll book the session with Fred and see how things go. Before I do that I want to replace the bearing in the carb as its causing some free play in the spindle which manifests as an imbalance on minor throttle openings.

Saturday, April 25, 2009

R1 Spares

I needed some spare parts for the engine I bought:
  • Oil sump gasket
  • Clutch cover gasket
  • Exhaust Manifold gasket - There are four olives in total
  • Oil loop pipe, looking at the front of the engine, from right to left, there is the oil filter, oil cooler, and a 4" long pipe that exits the block moves up for a couple of inches, and then enters the engine again, this was bent so I needed a new one.
I tried Roadrunner Motoren in Arnhem, but annoyingly they wanted to know the license number of the bike so they could look it up in their system, but obviously its not in a bike, let alone a dutch registered one so that wasn't going to happen. I tried with the engine number but my experience with calling [help]desks told me that it was time to cut my losses.

I'm going to Stoneleigh next weekend so I have The Bike Shop in Faversham a call since i'll be passing by at some point, they had the clutch gasket in stock, but will need to order the pipe so I'll pick them up on the way to Stoneleigh next weekend and post the part numbers once I know what they are.

Thursday, April 23, 2009

Rolling Road

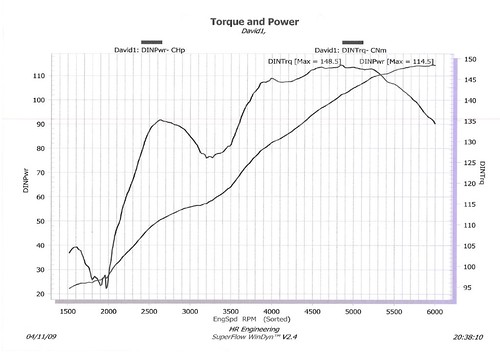
Took the car to hotrod to get it on the rollers, worked out quite an expensive afternoon but was well worth it, the emulsion jets, main jets, idle jets, and pump jets were all changed, power was up from 114hp to 122hp (And climbing) at 6000rpm which was nice.  The midrange has been transformed though, much more torque, and gentle throttle openings are much more responsive now.  One carb could do with an overhaul and a new bearing as its sticking, so I'll take that off and replace the bearings soon.  

It was over fuelling around 3500rpm causing a big power dip.  New emulsion tubes and main jets made a big difference:


Never without a drama, i turned around from the car to go and do something else and was immediately covered in hot coolant, the pipe split between the thermostat housing and the manifold, I guess because its now at a slight angle since i've put the new manifold on, managed not to soak the dyno or computer thankfully.  I replaced it with some thicker straight hose and an elbow which Fred had spare.  I wonder if that was were my coolant was going.

I've been driving the fury daily this week as the weather has been  outstanding, and its doing well, the alternator appears not to be charging properly at the moment although its still starting etc, possibly a loose wire, broken ammeter, or broken alternator so will have a look.  The gearbox is also moving on its rear mount so I need to brace it somehow.

It wont fit

Trying to get the engine to fit, but its not happening for some reason.  The manifold hits the top rail on the N/S, if i move it further to the O/S then it hits the top rail for the pedal box, if I move it forward, there's no plate to bolt the mounts onto.  Much confusion.

I've cut down the mounts where I can to give me more room and once I have the right holes made, I'll weld the right brackets back on, but its turning into a palava now as I want it low, as far back as possible, level, and exactly in line with the reverse box which is now fitted, I'd like to make up some spacers for the reverse box so that it doesn't use shims to get the height.  I've decided to put the reverse box in such a position so that the angle between the horizontal and vertical of both prop shafts is the same to reduce the amount of angular displacement, and subsequently the vibration as each prop shaft turns.  The alternative is to have the smaller one do most of the vibrating as its smaller and lighter this may be better.

Both props are adjustable length, and I can change the shims in the reverse box, so I can change my mind on this relatively easily.

Engine Fi

Bleeding Brakes

Now I have all the suspension bits, I decided to bleed the brakes, didn't make a very good job of it for three reasons, the first was that the bleed screws didn't appear to let fluid out of the hole at the top where the hose goes onto, but rather around the threads which makes a total mess.   It turns out I was doing it wrong and I was unscrewing not the bleed screw, but the thing the bleed screw screws into, so I will try again and do it properly.

Secondly, I use an eezibleed because I'm impatient and I don't like messing around with people pumping pedals and chanting traditional chants whilst facing east.  However, the kit doesn't have a fitting for the girling reservoirs i have, so i took a spare lid, cut a hole in it, and fitted it with the adaptor, i tested the pressure with the airline and it all looked good, screwed it in and connected it to the air line (Still at 15psi.) shortly afterwards, I was drenched by a torrent of dot 4 fluid as I'd forgot to put the rubber seal back in the lid before I screwed it on.  

Lastly after much faffing around, I couldn't get the air out, and so started cleaning up fluid, it made a right mess, but the reality was it was probably less than half a pint of fluid.  Just as I finished tidying up I realized that the calipers had two bleed nipples per side (4 in total) I'd left the wheels on, and forgot there are inner and outer nipples at both top and bottom.  What a plonker I felt.