Showing posts with label Fury. Show all posts

Friday, September 3, 2010

Interior Finished

I finished the interior of the car this weekend. I was being held up mainly as I had to wait on some parts. I had to fit the on/on/on switch for the wipers, however in some fit of mouser madness I misread the part number and whilst it is an on-on-on switch, its actually not any use on its own, as its positions are Z+X X+A A+B which means I still need to use a relay. So I just broke, and wired up a relay that breaks the park circuit when the wipers are on. They wipe, and seem to do so pretty quickly.

SDC10444

I fitted the replacement flasher, which flashes, and checked all the switches function as they should. They did, so I bolted in the dash, its pretty solid, and fits just the way it should. I think it looks really good, and am very pleased with the end result. It was definitely worth all the mess. I cleaned the interior with an air gun, hoover, and fabric cleaner, and routed the internal wiring, and stuck down the side carpets. The immobilizer stopped working because the sensor was too far away from the fob, so i need to move it somewhere else, but I'm not sure where yet.

SDC10446

I then trimmed down the seat belt tails to a more sensible size, i went for six inches past the buckle. Next up was to trim around the windscreen. My plan here is to use alcantara, with one edge tucked under the windscreen ever so slightly (should be fine since its bonded in place with copious amounts of PU) and the other is held down with some U trim which also puts the required radious on the edge of the windscreen surround. I then used contact adhesive in the bits in the middle, so hopefully it will all stay up there. It was fiddly and took forever, but looks pretty good now.

SDC10437

I bolted up the hideous sierra steering wheel, and checked everything worked, it did so had a celebratory drive around the car park, gear change is crappy since there is no tactile feedback from the lever, but this will be easily remedied post IVA. The car is pretty quick, first gear is pretty tall though, i'm hoping the 3.21 diff was the right choice afterall. The interior is now finished, I'll need to start covering it when i'm doing messy jobs to try and keep it nice and clean.

SDC10441

Friday, August 20, 2010

Wipers and Intercom

Fitted the windscreen wipers, these have a 95 degree sweep, so I've mounted the offside one just to the right of the steering wheel center, and the other about 5" to the left of where the tip of the blade finishes. Finding the position was easier than I expected, using a protractor and the arms and some tape I put them in various positions and checked that the were not missing anything in my field of vision.

SDC10373

Fitting the wheel boxes to the motor on the other hand was endless frustration. The theory is simple enough, there is a corrugated flexible bit of wire that runs through some copper tube from the motor to the wheel boxes, the wheel in the wheel boxes is turned by the teeth on the wire, the wire is pushed and pulled by a crank on the end of the spindle.

SDC10388

I measured and cut the tube, and used a mandrel to bend it into the right shape, offered it up to the wire, and of course, it didn't go in. The wire is about 8mm, as is the ID of the copper tube. I de-burred the edge, and tried again and it got as far as the first bend, where of course it was too narrow to go any further. I spent a good few hours trying smaller radius bends, before finding another roll of ever so slightly larger tube that allowed at least some movement.

I then flared the end, before noticing that i hadn't put the nut on yet, after remedying that I offered up the rather inflexible assembly to the wheel box. This is located under the windscreen, above the electrical tray. It fits in there with a bit of bending, but removing the nuts on the end require the patience of job. These nuts are used to clamp the copper pipe in place, the wire then goes through the wheel box, and into another section of copper tube. I spent a good hour wiggling, and eventually managed to get the wire to pass over the lip on the clamp, another eternity tightening it up, before i (thankfully) had the good wisdom to test it worked, because as soon as i pressed the button the fuse popped. Tried again with a slightly larger fuse, and it pushed the flare out the motor end, i yanked on the wire and it was locked solid.

I assumed this was down to the cable being crushed, but after removing it, it was obvious that you have to thread the wire through the wheel box, as there is not enough of a gap for it to sit home if you don't, so basically when i tightened up the clamp i was just locking the wire in place.

I decided at this point, that things were getting too complicated, so i decided to use 10mm ally tube, and move the motor inside the car to eliminate the need for tight bends in the tube, this should allow the mechanism to run smoothly as well as making it easier to fit.

SDC10378

I drilled out the brass nut on the motor to 10mm, and put a flare on the tube, put the nut in a vice and screwed in an alloy boss which sits in the motor housing and is clamped in place by the cover of the motor. Of course i over tightened it and it sheered away in my hand. This was turning into a bit of a bodge, so after a bite to eat, i decided the best option was to make a new boss. (its simply a T shaped bit of metal with a hole in it) I did this by taking some alloy bar, turning it down so it had a lip on it. I then brazed the alloy tube to it using durafix, and some air of professionalism started to return to the finished result.

With it all bolt in place, the mechanism moves very smoothly, and is rock solid, which was pretty much what I wanted. I can now keep myself awake when i sit in the car by being slapped in the face by the wiper arm until I get round to sorting out a windscreen.

SDC10380

Next job was to fit the intercom. I've mounted it on the sidepod to my right, just at the end of my arms reach under the dash, to make the wiring tidier, i drilled a series of holes in the back of the casing and routed the power, and comms wires out there, leaving just the inputs for the music/gps etc at the front. The wires for the headsets will run along the outside of the sidepod to their rubber mounts.

SDC10387

The side repeaters are also fitted and wired up, along with an indicator switch and working hazard switch (Using a conventional way of doing things.) which will do until SVA, although for some reason my flasher wont flash, i tried a different flasher, and it flashes, but at the wrong rate due the LED lights, so i've ordered a replacement LED flasher unit.

SDC10412

I made a very crude, and tbh not very good shift lever by extending a momentary on toggle switch with some alloy tube, this will do until I get rid of the ginormous sierra steering wheel (Post IVA) and can fit a proper flappy panel wotsit behind the smaller momo one.

SDC10384

Fury Todo List

Its mainly little jobs now, in no particular order these are:


  • Interior
    • Fit the dashhboard
      • Mount the dash
      • Mount the T-Pull handle for the fire extinguisher
      • buy and fit a working flasher relay
      • Fit (Temporary) buttons for dip/mains and horn
      • Make and fit temporary shift lever
      • Fit the heater hose from the dash to the heater
      • Fit the heater hose from the heater to the driver footwell (Exhaust should keep the passenger warm.)
      • Fit a working switch for the heater fan
      • Fit the intercom
      • Order and fit switch for wipers
    • Stick down carpeting
    • Carpet around the windscreen aperture
  • Engine:
    • Make an airbox to get through SVA
    • Adapt existing air filter to sit 180 degrees from its current location and make hole in bonnet
    • Remove AIS system and turn it into a breather system
    • Order and fit a catch tank
    • Change the O-Ring on the sump for a yamaha part
    • Order and fit alloy tubes as current ones seem to be porous
  • Bodywork:
    • Glue rear lights in place
    • Use some PU to fill any gaps
    • Fit front air dam
    • Buy and fit some mirrors
    • Wash clean and polish
    • Buy and fit rear diffuser
    • Fit side repeaters
  • Windscreen:
    • Buy and fit windscreen
    • Fit windscreen wipers
    • Fit washer nozzle
  • Brakes:
    • Set the brake bias
    • weld up the bias bar for IVA
    • Remove the bias bar adapter
  • Wheels
    • Balance the wheels as a couple of the sticky weights came off
    • Fit all the wheel nuts, and cut down the front studs if required
  • Suspension
    • Book and appointment to get suspension set up and corner weighted

Bonnet pins and rollbar

Bonded in the bonnet pin mounts to the side pods, but i think it will need to be bolted, i'll bolt them in at a later stage when i have a good reason to faff with the side pods.


Put a final coat of black on the roll bar, and bolted it in only to find out i'd ran out of m10 nylocs, managed to find one, which is enough to hold it in place, with the other bolts just screwed into nothing. Will pick some up on Monday and finish the job.

This didn't stop me from adjusting the harnesses and fitting them, with the adjusters in the right place they are a lot more comfortable and of coarse, a better fit, whilst very comfortable the seats are tight to the bone, to the point i can actually feel the seatbelt through my jeans. Must lay off the pies.


I spent the rest of the evening tidying up the garage as i hadn't really put anything away since before I left for spain. The seven needs some post-trip-love, or at least a wash, so i might try to get started with that tomorrow. Its dripping oil on the floor so i'll put of washing the floor (which is now a little slippy) for a bit longer, or until i slip and crack my head properly.

Next up in the fury is to finish of the electrical parts. Until I can get a circuit board manufactured for an affordable price, i'll use a normal toggle switch for the indicators. The hazards need to work with the ignition off, which presents a problem, with the ignition off, and key removed, i can turn on the hazards, this is run from a permanent live feed. However, the indicators, work from the ignition feed. If i have the hazards on, and turn on the indicators then the ignition circuit is live too as power can flow back up the feed from the ignition circuit. I'll put a nc relay in there to cut the power for now. I also need to find myself an on-on-on dual throw toggle switch for the wipers, for now i'll just leave the wires ready to attach.

If all goes well with the wiring i'll have a go at fitting the wipers.

10% of the progress, 90% of the time

I'm down to the predominantly little jobs. I picked up the shifter arm when I was last in the UK, so I fitted that to the flat-shifter solenoid,


I need to finish the wiring, and there is now nothing in the way of this, so i've been out with my soldering iron, loom tape, and zip ties. The engine bay is now complete, with the flat-shifter-max wired in, and connectors ready for the rest of the flat-shifter post IVA.

All the engine loom is tidied away nicely, however I think i will need to make a support for the bike loom as its a little too short to sit on the bulkhead nicely.


Next up was the bonnet catches, these are aluminum cases with locking pins, these look pretty nice, and are strong enough, however the bonnet has a pretty poor fit around the side-pods, as the pins are not locked, I think they may end up coming loose due to the side pressure.

To stop this happening, i've bonded and riveted in some plates to the bonnet, the plates have a pin in them which goes vertically through the side pod, this keeps the bonnet in place horizontally, whilst the locks keep it in place vertically.


Next job is to fabricate the mounts on the sidepod that secure the bonnet to the car.

Sunday, August 1, 2010

The fury lives

After two destroyed wiring looms I finally got the engine wired up properly in the fury. The trick is to completely ignore the wiring diagram in the owners manual.

The first time, I wired it up based on the colours and connections indiciated in the manual by shortening the loom, and things were very confused. After an enormous amount of faffing i got the ECU to intermittantly function.
The initial loom from the R1
The second time I got exactly the same results but with no functionality by wiring it directly from the wiring diagram. The reality is that there are quite a few additional connections, earths, shared VRef feeds etc, that are not indicated on the diagram, as well as a few circuits for the ECU that are simply missing, immobilizer for example.
CIMG0726
What I did in the end was wire up ll the sensors, get the ecu to report fault codes, and work as expected, then on at a time removed things that were not connected up to anything. This left me with a minimal loom, including relays, fuses etc. I then followed each wire to the fuse box, and cut it at the fuse box end. The cut wire was then re-routed, and extended/shortened as required to the engine feed wires.

Each time I did this, I turned everything on and made sure that things were still functioning, this made it easy to find any problems if I introduced any.

The result is that I now have a handful of wires coming out of the bulkhead to power and control the engine, these are tidily spliced into the engine loom which also goes through the bulkhead to the ECU.

The end result was that I could start the car, it fired up first time, with no fiddling which was just what I'd hoped for. I let it tick over for a while checking for bad sounds, leaks and any problems.

Things got pretty smokey as the heat wrap burned off all its chemicals, but settled down nicely, the side pod gets pretty hot, above the manifold where there is no heat shielding, but stays pretty cool everywhere else which I hope will be fine. I think I will make another hole in the rear of the pod to let the air out when driving though.

Hans came over so we fired it up again and had some fun with the loud pedal.


Since then I've taken it for a quick spin around the garage car park, this is going to be great when its on the road.


Saturday, April 3, 2010

Engine

I thought I was all set to start the engine in the Fury, the last time I did anything with the engine, i was unable to get the expected output on the original bike clocks. I put it to the side as actually starting the engine was a long way off.

Since then I've plumbed the engine, and lengthened/shortened the loom to fit the car installation, the prop shafts are connected, the wheels are on, and the controls are connected up. It was time to have a go starting it.

I put the engine fuses in, filled the engine with 3.8l (Total oil capacity according to the service manual) and wired the bike clocks up permanently, it took a while to work out which wire did what for power and earth. It immediately registered a few error codes, i reduced this down to one for the EXUP motor, which i am not using.

I turned the engine over, and the digi dash registered a tach signal, and the injectors were firing, and the fuel pump was running when turning over. The engine had oil pressure, it was time to start the car.

I pushed it outside, filled it with fuel, and went to start it up, for some reason the bike dash was no longer displaying any error codes, and i had no sparks, no fuel pump and no injector firing. I spent the rest of the day trying to find the problem, it seems to be related to the wiring, and the relay box. I think the fault is somewhere between the ECU and the Relay box, related to either the immobilizer, or the relay box itself. I think the ECU is not receiving any indication that it should run.

I also found a minor wiring problem, in that i'd wired up the connection between the ECU and the #1 injector to the ignition live. They both use the same color wire. It does make me worry what other mistakes i've made though. I also noticed that I could hear a relay clicking when i leant on the wiring loom. I expect that this is probably the root cause, and is either a break int he wire, or an intermittent short somewhere.


Saturday, January 23, 2010

Wiring

So, to finish the car, I 'just' have to:Fit the windscreen wipers, and windscreen
Fit the gauges, switches, vents and dashboard (all part of the same job.)
Fit the rear lights
Make an under tray and flat floor.
Powder coat the rollover bar (Painting this has been a series of disasters.)
Wire the whole thingFill with oil and waterStart. Drive. Smile.

The windscreen and wipers will be the last thing I do, as it will restrict access to everything else once it is in there. Rear lights are on order, and im still deciding over the gauges and layout of the dash, so the logical thing to do now is the wiring. I'm going to make my own loom, although there are a few off-the-shelf options that are very appealing. Premier Wiring make a great Lucas based loom, Alan the chap who runs Premier Wiring will do more or less any length/combination of clips etc, but there are a few fundamental things that are suboptimal about the loom. Mainly the proportions aren't quite right for such a small. I always find i'm
cutting out things and faffing around to make it tidy. For the money though, the quality is outstanding and its very well made.

Stafford Vehicle Components also do a 'Rapidfit' Loom and some others, these are more expensive versions of the Premier wiring loom, and whilst these look well made, ultimately are not going to be quite what I want, especially as I'm aiming to save weight, and have some specific requirements for lighting and accessories such as camera/intercom etc which all must be powered and require non-12v feeds.

The front of the loom will be supported by a tray underneath the dashboard, this will keep everything tidy. Instead of fuses I will be using circuit breakers, I hate fuses, they have a really annoying habit of blowing when i've run out, and I find them generally fiddly. Circuit breakers work pretty much instantly, which is also a good thing, but can also be reset easily and give a clear indication that they have tripped which makes fault finding simpler. Where possible I shall use Lucas color codes.

The main power control is via an FIA master switch close to the battery, this feeds the ignition key which is the main on/off switch for the car. I will fit this after IVA.

The IVA requires that the side (Parking) lights can be on with the ignition off. In order to remove any ambiguity over what qualifies for the Ignition, I shall remove the FIA master switch for IVA. Some cars disable the headlights when the ignition is off leaving just the sidelights on even if the dipped headlights are still switched on. This is handy as it means you are less likely to run the battery flat if you leave your lights on, but the simplest way is simply to wire all lights via permenant live.

I am using toggle switches for primary light control, these are rated to at last 24 Amps at 12V, this means I can power the lights directly from the switch. However I'm using a momentary on push button and a bistable latching relay to control dip/main beams. This enables me to have a button on or near the steering wheel so that I can dip the lights quickly when driving at pace without moving my hands from the steering wheel.

The push button will also flash the main beams if the lights are not switched on. There is no requirement in the IVA for this, however it is my personal preference.

I'm doubtful if the generator on the bike engine will be able to cope with driving lamps, however I will wire these in regardless. (I want to avoid splicing circuits at a later stage.) This will be done through an off/on/on toggle switch. When set to off, the driving lights will remain off regardless. When set to position 1, the lights will illuminate with main beams. When set to position 2, the lights will light when the dipped and main beams are on. The load from these lights in combination with the headlights may be too much for a toggle switch, so I shall wire these through a separate r
elay.

The IVA states that the fog light must come on when selected and when the dipped or main beams are on, it is wired through the main lighting circuit, there is no need for a relay for this.

Brake and reverse lights are wired via the ignition switch.

I'm using a lower power, constant rate flasher unit, this has a feed from the permanent live, and goes to the indicator control box, which i've designed to use single push buttons on the wheel. the control box also controls the hazard waring lamps, which must work with the ignition off.

There are separate circuits for comms/cameras, auxiliary devices (both perm and ign live) dashboard electronics including heater/fan, windscreen wipers, and the engine.

The engine loom is completely seperate with 7 wires going back to the main loom for fuel pump (switched live.) fan, (Switched earth), Permanent Live, Ignition Live, Run, and Start (Switched Earth)


Monday, January 18, 2010

Little Jobs

Refitted the steering column, this was quite fiddly as it needed to be adjusted so that I can get in and out, as well as enabling me to get the dashboard on and off. If I ever take it off again I'll make up a set of shims rather than using about 20 washers to give the right spacing.

The dashboard was drilled to accept the rod for the gear change, and a final coat of glass matt on the underside where the brackets are. The brackets bolt to the bulkhead to give strength to the top, the front will bolt to the metal bar. I added some filler to some of the areas with imperfections. It is now ready for final fitment. I can't do that until the wiring is done and ideally not until after all the buttons/gauges/dials are fitted.

I noticed that there are a couple of drips from the coolant pipes so i may have to get some proper joiners made up.

I cleaned up the engine bay with the air line and blew out all the dust and fiberglass remains that had found there way in everywhere. I think the wiring will be the next major job to do will be the wiring as this is going to be the bottleneck for a few other jobs.

I started with some ideas for the rear lights, more to come on that another day.

Wednesday, December 30, 2009

Interior Trim

I started with the interior trim in the Fury, anything that I'm likely to come into contact with, which is basically the horizontal panels on the inside are lined with foam sheet, and then covered with Alcantara. The other visible panels will be covered in Alcantara.

Progress is quite quick on this, but I've run out of glue so no more progress until after new year.

IMG_1115

First I cut the foam to size, then covered the foam in Alcantara. For removable panels the aluminum was bonded to the foam, however where the foam fits up to the GRP I will use velcro or trim fasteners to hold it in place.

IMG_1114

Once the foam was cut to size the alcantara was then attached to the foam using contact adhesive.

Starting to cover the interior in alcantara

The Alcantara has a very nice feel and I think it is a good contrast against the orange tubing.

Lockwiring

I'm pretty sure I don't need to take the prop shafts out now, so today I fitted the bolts for a final time. This is something you want to get right, as the prop shafts turn at very high rpm. If they come off, the end that comes off will flay around. This is a bad thing. Sometimes its just a case of new panels, other times it can sever the fuel lines causing the car to catch fire or if it breaches the floor, the car could be jacked up, causing it to rollover, or if it breaches the panelling into the cockpit it can cause injury to me or a passenger.

Bike engines produce a lot of vibrations and this has a habit of causing things to loosen off. In addition, there are two prop shafts, and a sprocket adapter which is three times as many things to fall off as on the seven.

My plan therefore is to use three things to stop the bolts coming off:


  1. Tighten the bolts RFT.

  2. Use threadlock on all bolts

  3. Use lockwire or a locking tab on all bolts.


The sprocket adapter bolt is a tricky one, as it is enclosed by the prop and the adapter, this is tightened to 86nm, with locktite, and it has a locking tab which i've hammered down. The problem is however, that I cannot see this bolt visually to check periodically. What I will do initially is retighten it after 100 miles, if it is loose then it will just have to be done regularly or i'll drill a hole in the adapter and lockwire it. To give me an indication of any movement, I've put a line of paint at the joint, if the bolt is coming loose there will be a gap (however small) betwen the line of paint and the adapter which should give an early indication. The bolts are M8 cap head grade 12, and are tightened as tight as I can get them, threadlocked, lockwired, and marked.

All prop shaft bolts are lock wired and marked

The reversing box uses M8 bolts, these are grade 12, and tightened as tight as I can get them with the spanner, again threadlocked. These are lockwired in pairs and marked with paint.

All other bolts are lock wired and marked.

The rear flange uses nuts and bolts, again grade 12 bolts, with nylocs and threadlock. I've lockwired the bolts and used a locking tab on the rear which is bent over the nuts to stop them turning. Again they are tightened as tight as I can, and marked for security.

Rear prop shaft bolts are lock wired, and also have locking tabs made to stop the nuts turning.

Sunday, December 6, 2009

Todo

Seven
Engine
  • Fit and reinforce engine mounts to ensure they wont fail in the same way again.
  • Fix or replace sump, either shorten the existing one or just stick a non-battered one on, whichever is easiest. Potentially make a sump guard.
  • Change crank shaft end seal for one that doesn't let oil pour out - some people find a bit of oil acceptable but I find it embarrassing so it needs to be sorted out.
  • Since the engine will be out I want to change the cam, I'm relatively happy with the piper 285 cam, it has lots of torque from low RPM, and reasonable high end power so changing it is a bit of a gamble. I've decided on the kent 244 cam, its a high lift cam, and should give improved top end power, with a loss of low end torque. To compensate I'm going to be running fuel injection, which should enable better fueling at low RPM and pull the torque up a little.
  • Remove cylinder head, de-coke, and examine engine for wear- I'm interested to see the state of the valve seats after 7000 miles using additive, its also a good time to change the head gasket, its got pretty hot a couple of times, and I'd like to ensure there are no failures in the gasket.
Fueling
  • Fit the Mega squirt (Microsquirt) for full fuel injection.
  • Buy and Fit a larger fuel tank - 20 liters just isn't going to cut it, I feel I'm constantly refueling.
  • Fit larger fuel lines with a return to the tank, for fuel injection I will need a fuel return, standard sizes seem to be based around 10mm for fuel feed, rather than 8.
  • Fit the in line fuel filter and buy and fit injection pump
  • Fit the throttle bodies from the GSXR 750
  • Permanently install the wide-band LC-1
Bodywork
  • Remove the scratches from the bonnet, remove the nuts and bond it into one single piece rather than the Sort out the bodywork, fill up the hole where the aerocatch doesn't fit due to the intake system and make it orange again.
  • Make a new boot box, i'll need this because the fuel tank will be a different shape, and wont fit within the current one, it is also starting to rot a little and needs to be made out of something non-wooden.
  • Fit a new drivers side mirror as the current one is beyond service.
  • Paint the interior where the paint has worn and touch up the rest of the car as appropriate.
  • Make and fit ally floor covers
Electrical
  • Accessory wiring needs to be rewired, with heavier wire, and a smaller, dedicated fuse.
  • Decide on a data logging solution that is compatible with the mega squirt
Other
  • APK is due in December.
Fury
  • Fit alcantara cloth I got for the interior
  • Finish dashboard buck and make dash
  • Wire engine completely
  • Fit passenger seat and seat belt
  • Paint and refit roll over bar
  • Make car bottom from ali and fit
  • Fit the prop shafts with grade 12 bolts
  • Fit steering wheel and boss
  • Figure out the dash layout, and the logic design for the indicators on the steering wheel.
  • Figure out the appropriate adaptors needed for the oil pressure/temp senders
  • Decide on the dat logger I want to use
  • Get the rear lights and wire the rest of the car
Garage
  • Fit car ramp, wire in new motor or inverter as required
  • Enlarge mezzanine as appropriate.
  • Do a full clear out post-sanding.


Thursday, August 6, 2009

Prop Shafts

Phoned Dunning and Fairbank about the prop shafts, latest estimate is early next week.  This reminded me I need to order some high grade bolts to install them with, so will put an order in at Namrick later.


Body arrived

Collected the bodywork, tank, driveshafts and the orders I put in at Demon-Tweeks and Rally Design, the immobilizer from Ebay arrived too, however the elbows from SFS Performance are another story, I phoned on Thursday and they had been shipped, however what they didnt tell me at the time is that they shipped to the invoice address which is in Scotland. Oh well, Dad is going to send them out to me.

In the mean time I've got the tank in, but I can't find the manual for the fuel sender which gets shortened and adjusted, but I can't remember which way around it needs to be assembled.

Driveshafts are in, but I didnt have a suitably large socket, so I've ordered a 40mm one from ebay which should fit the nuts.  These need to be tightened to 220Nm or in other words Really Really F. Tight. (RFT.) 

I put in the tubing for the electrical cables, i ran a spur to each side which meets in the gap in front of the tank.  I then bonded in the boot floor.

Plumbing for the fuel lines is completed at the rear, the tank has a breather and return at the top, the breather goes up a little to the one way valve, and then down again, exiting at floor level - I will install a grommit or something in the floor for this when I panel it.

The return goes up from the copper pipe and straight in.  The feed goes along under the diff and round 180 degrees into the filter which is mounted in the diff housing where I can get it out the side.  It then goes under the tank and into the fuel pump, and out the pump up and into the copper pipe to the front.

Things to do right now are:

  • Torque up the rear hub nuts
  • Get the rear tub on properly, it needs trimming and fitting.
  • Remove the exhaust and fit the side-pods
  • Check and adjust the engine position as required.
  • Refit the exhaust, check that its not fouling anything, fit the bracket properly.
  • Cover the exhaust and side-pod with heat insulation stuff
  • Phone Dunning and Fairbanks and find out what has happened to my prop shafts, fit them.
  • Fit the heater matrix
  • Plumb the cooling system with the elbows, 
  • Sort out the clutch now I have the bolt
  • Fit the replacement oil pipe
  • Connect up the wiring, add a little fuel and see if I can start the beast, and have the first drive out the garage.
That should keep me going for a while


Friday, July 24, 2009

More Ordering

The bodywork has been taking its time, actually, that's not quite correct, the body work was ready about 3 weeks after I ordered it, however as a prerequisite for fitting the bodywork, i need to fit both the fuel tank, and the drive shafts.

The drive shafts are needed so that the wheels will stay attached to the hubs, which I feel is important so that I can sit the car on the ground at the correct ride height and make sure everything lines up as I want it.

The fuel tank needs to go on before the bodywork, as its a complete pig to get in and out with the body work on.

Chris got started on the fuel tank this week, and the drive shafts have been cut and shut, but not welded yet, so it looks like its going to be mid next week before they arrive. The result is that I've not had much to do on the car for a while other than little jobs. As it looks like its almost ready now, I've ordered some more bits that I'll need.

I ordered the prop shafts, I had a chat with Dunning and Fairbank, they were very helpful and returned my call very quickly which made me feel loved. I put an order in for two shafts, the front one between the Sprocket Adaptor and the Quaife Reversing box is 383mm. The one between the Quaife Reversing box and the Freelander Diff is 755mm long. The Quaife box and the Sprocket Adaptor use the Ford "English" diff flange dimensions, the freelander is a different but well used size and the flanges are available off the shelf. The rear prop shaft has a TRT Tube in it which absorbes some of the spikes in torque when changing gear and results in less wear when changing gear.

Both props have about 51mm of movement, so if I decided I need to lower or move the engine for the bodywork it will still fit.

I also ordered the bends from the cooling system from SFS Performance, their prices are reasonable and do all their manufacturing on site. Their turnaround time for Orange hoses is around a week.

I needed an additional T piece to plumb in the input for the oil cooler, some hose, adaptors, and a fuel pressure regulator, so I ordered them from Demon Tweeks.

Thursday, April 23, 2009

It wont fit

Trying to get the engine to fit, but its not happening for some reason.  The manifold hits the top rail on the N/S, if i move it further to the O/S then it hits the top rail for the pedal box, if I move it forward, there's no plate to bolt the mounts onto.  Much confusion.

I've cut down the mounts where I can to give me more room and once I have the right holes made, I'll weld the right brackets back on, but its turning into a palava now as I want it low, as far back as possible, level, and exactly in line with the reverse box which is now fitted, I'd like to make up some spacers for the reverse box so that it doesn't use shims to get the height.  I've decided to put the reverse box in such a position so that the angle between the horizontal and vertical of both prop shafts is the same to reduce the amount of angular displacement, and subsequently the vibration as each prop shaft turns.  The alternative is to have the smaller one do most of the vibrating as its smaller and lighter this may be better.

Both props are adjustable length, and I can change the shims in the reverse box, so I can change my mind on this relatively easily.

Bleeding Brakes

Now I have all the suspension bits, I decided to bleed the brakes, didn't make a very good job of it for three reasons, the first was that the bleed screws didn't appear to let fluid out of the hole at the top where the hose goes onto, but rather around the threads which makes a total mess.   It turns out I was doing it wrong and I was unscrewing not the bleed screw, but the thing the bleed screw screws into, so I will try again and do it properly.

Secondly, I use an eezibleed because I'm impatient and I don't like messing around with people pumping pedals and chanting traditional chants whilst facing east.  However, the kit doesn't have a fitting for the girling reservoirs i have, so i took a spare lid, cut a hole in it, and fitted it with the adaptor, i tested the pressure with the airline and it all looked good, screwed it in and connected it to the air line (Still at 15psi.) shortly afterwards, I was drenched by a torrent of dot 4 fluid as I'd forgot to put the rubber seal back in the lid before I screwed it on.  

Lastly after much faffing around, I couldn't get the air out, and so started cleaning up fluid, it made a right mess, but the reality was it was probably less than half a pint of fluid.  Just as I finished tidying up I realized that the calipers had two bleed nipples per side (4 in total) I'd left the wheels on, and forgot there are inner and outer nipples at both top and bottom.  What a plonker I felt.

Thursday, March 19, 2009

Panelling

Started on the panelling, got the floor in, and started on the other ones, panel work is my least favorite car related activity.

Heater

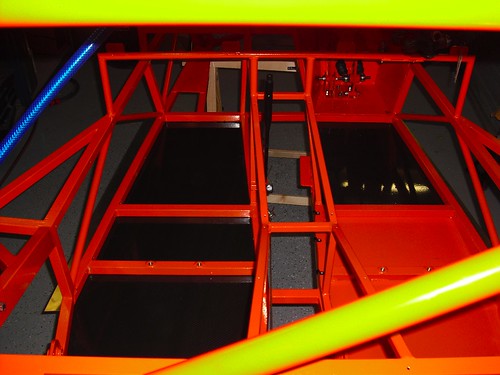
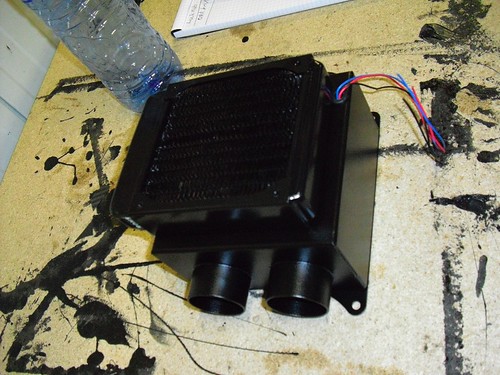
Heater arrived for the Fury, its a very small and pretty light heater unit.  I got it from GT40 Parts on ebay, it weighs 1.2kg, and I'll probably be able to get that down further using some aluminium plate.


Its pretty powerful, the only hard part is going to be positioning it so that it isn't the lowest point in the system.

Saturday, March 7, 2009

Current Status

Engine
  • I'm waiting on the engine mounts from Chris, once those are ready I can fit the engine.
  • Wiring will need to wait, until then it should start using the loom.
  • Exhaust, cat, manifold and tail pipe are on order.
Driveline
  • I need lock nuts and washers for the front hubs, then I can get the front end on the ground.
  • On the rear, I need to get the driveshafts as they hold the wheels on, chris should have these ready by the 4th april.
  • I can then bolt up the hub carriers properly.
  • I need to get a reversing box.
  • Once i get the engine, I can measure the size i need for the prop shafts and get them ordered.  Then the car will drive.
 
Suspension
  • Everything is all fitted, but...
  • I need lock nuts for the camber adjuster.
  • I also need lock nuts for the rear camber adjuster.
  • Once the alignment is done, I'll thread lock and mark the bolts.

Steering
  • The track rod ends don't fit, despite having rs2000 hubs, the steering arms aren't the rs2000 size, (or the track rod ends aren't rs2000 sized) so I need to find the right ones, with lock nuts.
  • Once I get the car on wheels and a seat in, I can mount the steering wheel in the right place, until then I can't fit the support.

Cooling System
  • I'm waiting on the engine before I can proceed, until I know where the appropriate hoses are, I can't order the hoses.  I also need the heater matrix so I can make sure the header tank is the highest point.
  • I can fit the radiator though.
Braking
  • Fit the lock nuts to the pushrods and fit the bias bar.
  • Fit the copper brake lines
  • Fit the bias adjuster
  • Find a solution for the flexible hoses, they are M10 Male, and I have M10 Male nipples, or 1/8NPTF holes.
  • Threadlock everything up, bleed the system and good to go.